
Sep 24, 2020
How to create a HubSpot workflow
- Establish your workflow enrollment triggers and map out your desired steps
- Choose the right workflow actions to accomplish your automation end goal
- Review your workflow settings to fine-tune your masterpiece
- Fire away when ready (i.e. turn on your workflow!)
- Monitor your workflow performance
The word “automation” can elicit some strong reactions.
For some, automation means progress. The bright, shiny future where all menial tasks are taken care of, and we can focus on the jobs we actually like doing. For others, automation means the robot overlords are coming to take away our jobs.
The truth of the situation lies somewhere in between these two extremes.
From a marketer’s perspective, marketing automation can be a useful tool to accomplish tasks that might otherwise be performed manually (such as email marketing, social media publishing, etc.)
By saving this time and energy, companies big and small can spend less time on tactical execution and more time on strategy.
But marketing automation should never come at the expense of customer experience. A hastily constructed lead nurture email that spits out irrelevant or useless information can do damage to the trust you’ve worked so hard to build.
So the question becomes: How can we automate in the right way to save time while also keeping the customer experience top of mind?
Why (and when) should you use marketing automation?
If you’re a HubSpot user, marketing automation is synonymous with HubSpot Workflows.
Many HubSpot users assume workflows are primarily used for email lead nurturing and while this is absolutely true, workflows are really the “Swiss army knife” of the HubSpot tool kit — they can be used in multiple applications and have (almost) endless possibilities.
From simple contact delays and internal team notifications to creating associated objects or updating property information, there’s a lot to consider when choosing your automation actions.
🎓 Free Related Course: Marketing Automation Mastery (with HubSpot Workflows)
If you’re asking yourself: When should I use automation? The answer should always be to benefit the end-user experience.
How can we quickly deliver a promised asset? How can we easily assign a ticket for a speedy resolution? How can we ensure that a prospective customer is properly registered for that upcoming webinar?
The answer to all of these questions is simple: use a HubSpot workflow to seamlessly (and consistently) accomplish these actions.
Here’s an abbreviated list of what you can automate with HubSpot workflows:
- Set a delay
- Add an if/then branch
- Go to another action within the workflow
- Enroll in another workflow
- Trigger a webhook
- Send an internal notification (via email, SMS, or in-app notification)
- Send an external email to a HubSpot contact
- Utilize certain 3rd party integrations (i.e. send a Slack notification, add a contact to a Zoom webinar, or set a task in Asana)
- Rotate an object assignment within a team
- Create a task
- Create a record (i.e. deal, ticket, or company)
- Set, copy, or clear a property value
- Add/remove from a static list
- Add/remove from an ads audience
- Set a SalesForce task
- Add to SalesForce campaign
But with all that power and endless combinations, it’s important to keep in mind that automation can definitely go awry.
Beyond simply sending out the wrong email to the wrong person, runaway workflows can wreak havoc on your database, breaking lists, adding false data points, and (in general) creating an epic mess for someone to clean up later.
This leads to another important question: When shouldn’t I use marketing automation?
The answer (much like the one above) hinges on user experience. If you’re trying to cut corners by reusing the same tired message or save time at the expense of the end-user experience, it’s probably not a good idea to automate.
To avoid the worst-case scenario of “automation run amuck,” you need to understand the limits of the machine and be strategic about when you call upon it.
Getting started with HubSpot Workflows
Each workflow you create should have a defined purpose or goal. Since there’s so much you can accomplish with automation these goals can range from…
- “I want to keep my team informed of where leads stand in our funnel”
- “I want to re-engage old leads”
- “I want to clean out old data properties from my database”
Whatever the goal, bringing it to life starts by determining which general category of workflow you need to build:
Internal workflows are used for any internal work that can be aided by the help of automated tasks firing behind the scenes. They’re perfect for ongoing database management (aka keeping your records clean and up to date with the latest and greatest information across all associated objects.)
You can also use internal workflows to send internal notifications or assign new leads dynamically to the appropriate sales rep.
External workflows are used for any external communications with your HubSpot contacts.
This can be anything from an automated email drip designed to re-engage cold leads, or an automated follow-up after a website visitor fills out a form. Every action can be highly targeted, based on sophisticated segmentation and if/then branch logic.
Internal and external workflows cover the entire spectrum of what’s possible with HubSpot automation — but there are so many other decisions to make when you’re building out the perfect marketing automation machine.
Now that we understand the two general “buckets” that workflows fall into, it’s time to dive into the specific actions that allow us to accomplish our previously predetermined workflow purpose or goal.
Everything you need to know about HubSpot’s object-based workflows
Building the perfect workflow starts by answering three simple questions:
- Is this an internal or external workflow?
- Which workflow do I need to build?
- Am I building my workflow from scratch or starting with a template?
We’ve already defined the two major “buckets” that workflows fall into in the section above, so let’s pivot to talk through the object-based workflows that are available in your HubSpot portal:
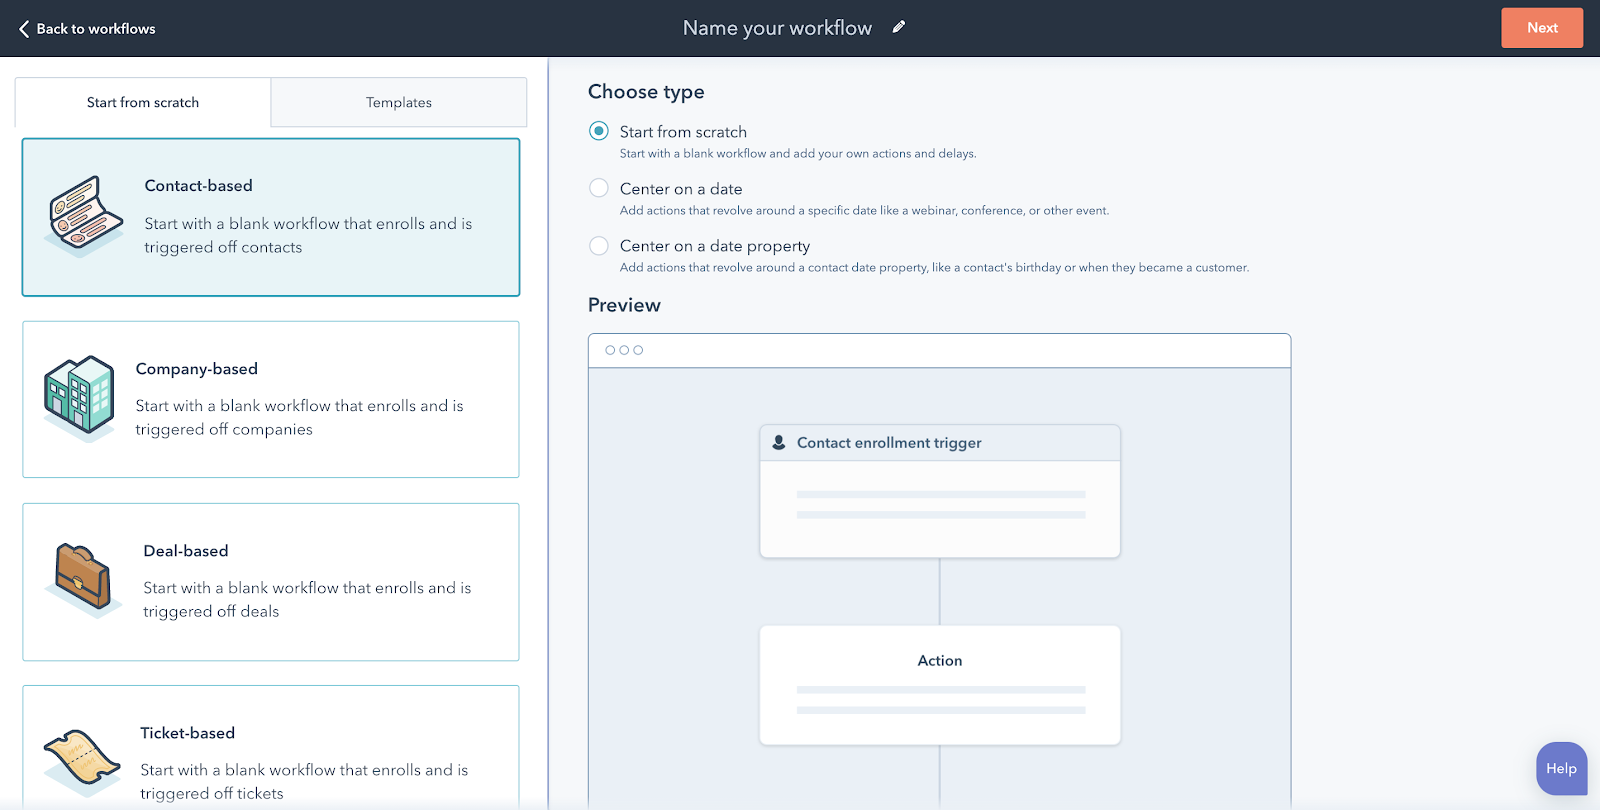
Contact-based workflows
Contact-based workflows is an object-based workflow originally rolled out in August 2012 at the inaugural INBOUND marketing conference — and they’ve come a long way in eight years.
Originally designed to segment and nurture contacts with top-quality email marketing content, contact-based workflow functionality has expanded to include dozens of additional actions such as:
- creating associated records, transferring property information between associated objects
- sending internal/external communications
- integrating with third-party applications to create a seamless user experience for event registration, team Slack notifications, or internal task management
Contact-based workflows also offer the flexibility to create additional varieties of workflows that are not available in other types.
For instance, you can center your workflow on a date or on a date property.
Centering actions on a date can be really useful for sending pre-event or post-event communications while centering actions on a date property can help you send automated emails for a contact’s birthday or the anniversary of when they became a customer.
Contact-based workflows are definitely the most robust area of HubSpot’s library of automation options, but there are still plenty of other unique actions that you can take with other object-based workflows.
Deal-based and ticket-based workflows
Deal-based and ticket-based workflows were rolled out at the same time in August 2018 to solve for the evolving needs of the HubSpot user.
The “customer relationship management” (CRM) software wasn’t just for contacts anymore! HubSpot was in the process of creating new objects such as associated deals (i.e. potential revenue wins for your sales team) and tickets (i.e. customer support issues for your CSRs.)
Enter deal-based and ticket-based workflows.
A deal-based or ticket-based workflows are automated sequences that enroll a sales deal or service ticket in the same actions that were previously only available to contacts.
These new automation offerings allow you to seamlessly pass information back and forth between associated records.
You can also trigger new action (i.e. internal notifications or kick-off emails) based on when a deal is marked “closed/won.” Or you can also send internal reminders to the customer service team if a ticket sits in a status stage for too long.
These new tools allowed HubSpot users to automate more of the customer journey — not just the initial lifecycle stages of a marketing lead, but the ups and downs of the deal stage progression, and the ongoing process of providing delight once a contact becomes a customer.
Company-based workflows
As HubSpot expanded into new objects, company-based workflows were introduced in September 2018 to help you manage CRM information and external communication at the company level.
Similar to contact-based workflows, you have the option to do internal tasks (such as set company properties), and send external communication (ex: a welcome email to all associated contacts at a company.)
This makes maintaining and working with company data much easier and is the approach is perfect for large B2B businesses that have a company-focused strategy, or account-based marketing (ABM) approach to larger deals.
Quote-based workflows
The final and most recent addition to the HubSpot workflow lineup is quote-based workflows.
This functionality is limited to Sales Hub enterprise customers and is designed to help large sales teams manage the process of closing quote-specific sales or sales based on how much revenue they may bring in (ex: using internal notifications, you can let your sales team know when a quote has been paid.)
For sales teams using HubSpot quotes, quote-based workflows are a game-changer for quickly and easily bringing that sale to closed/won. Workflow automation ensures that no quote gets left behind (while also ensuring that the sales rep doesn’t have to manually follow-up on every quote.)
Each of these five object-based workflows can be created from “scratch” or set up via a HubSpot workflow template. While templates are useful for new users who are just getting started with workflow, HubSpot only has a limited number of templates to offer.
Although workflow templates can be modified to fit your unique needs, once you’re comfortable in the tool, you’ll soon find that it’s much easier to start from scratch and build the exact automation functionality that you need to get the job done.
The 5 essential steps to building a HubSpot workflow
Now that we’ve identified our goal and reviewed the full menu of HubSpot automation options, we’re finally ready to answer the most important question: How the heck do I build a workflow?
The answer can be broken down into five steps…
Step 1: Establish your workflow enrollment triggers and map out your desired steps
No matter what type of object-based workflow you build, all automation starts with a trigger or action/quality that sets everything in motion.
Sometimes that trigger is a list membership or a form submission. In other scenarios, maybe a contact property update or a page view makes the most sense. Regardless of the criteria you eventually decide to use, it’s important to think through your enrollment triggers to ensure that you only include the right contacts, deals, or companies in your workflow.
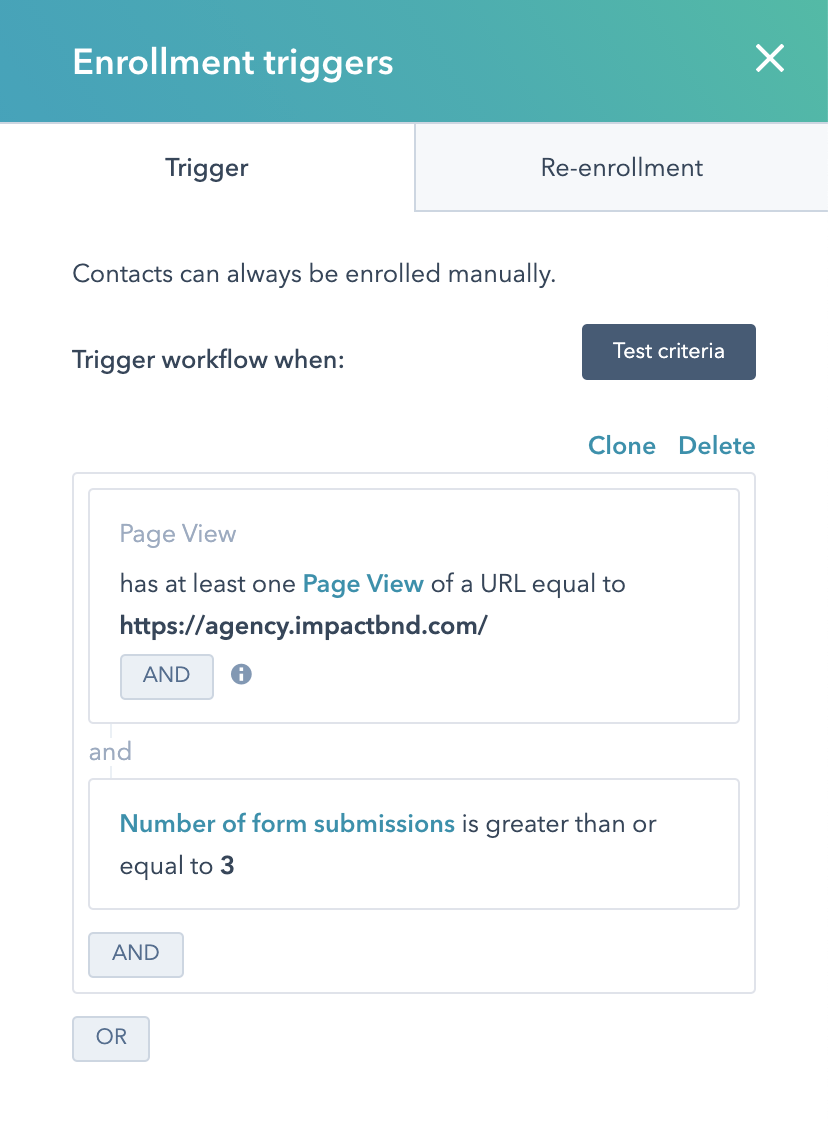
Much like HubSpot’s active lists tool, enrollment triggers can use multiple criteria and employ “AND / OR” logic to target very granular segments of your database for automation.
For example, if I wanted to enroll a website visitor in a lead nurture workflow when they’ve visited IMPACT’s agency services page and filled out at least three forms on our website, I would use a contact-based workflow with the following enrollment triggers:
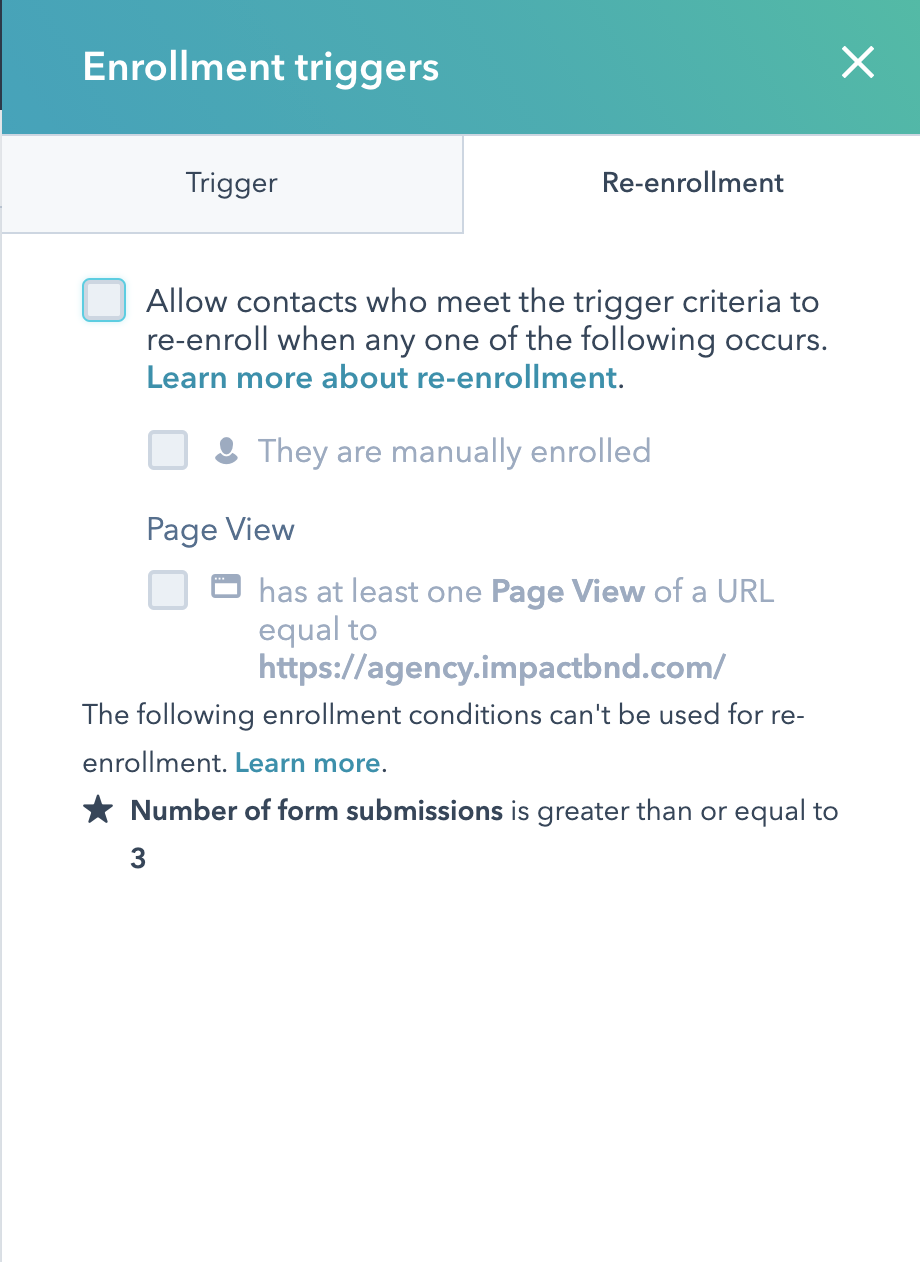
In addition to your enrollment triggers, you should also use this stage as an opportunity to evaluate whether or not you are going to allow re-enrollment in your workflow. In other words, if you will let a contact run through the workflow actions more than once.
By default, your workflow will be set to not allow for re-enrollment, but there are some scenarios where re-enrollment might make sense.
In the lead nurture workflow example, enrollment wouldn’t make sense, because you would not want a HubSpot contact to receive the same series of re-engagement emails multiple times.
However, if you created a workflow that was triggered when a website visitor fills out a lead magnet form, re-enrollment would make sense, because you would want an automated email to deliver that asset each time a website visitor fills out that form.
One final option is to set no enrollment triggers at all. This takes away some of the “automated” magic in marketing automation, but once your workflow is turned on, records can be enrolled manually via the “enroll” button in the upper-right corner of your workflow, or via the “workflow memberships” section of a contact record.
Note: Keep in mind that at any point in the process you can test your criteria to ensure that your enrollment logic is actually targeting the right HubSpot records. You can also go back to edit your enrollment triggers and re-enrollment settings at any time.
Once you understand enrollment, you need to work out exactly what you want to accomplish and what actions you’ll take to get there. This is where pre-mapping-out your workflow steps comes in handy.
We’ll work out the process of choosing the proper automation actions in Step 2, but at this stage, writing out a simple end goal with the basic steps to get there should suffice.
For example:
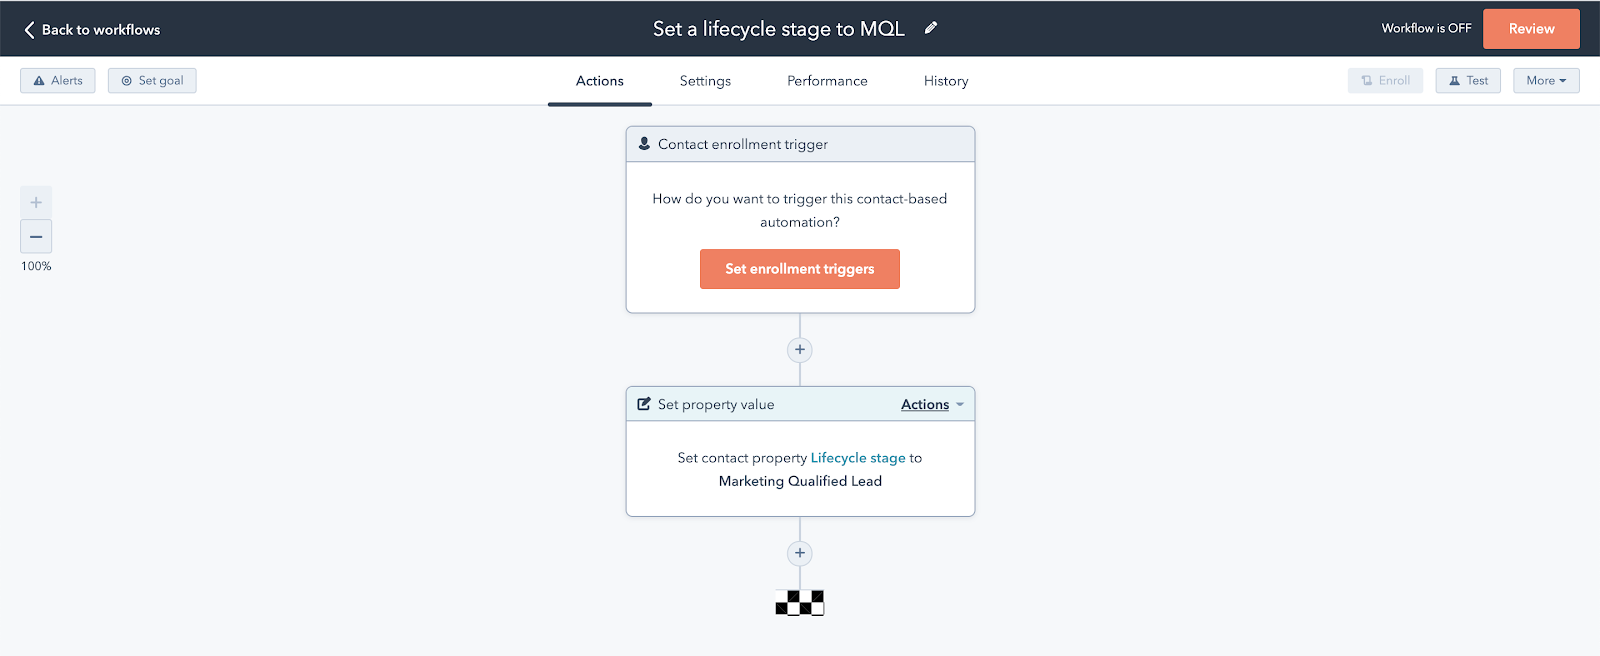
- My goal is to notify my sales team of a new sales qualified lead
- My steps are to (1) enroll leads who meet a certain lead scoring threshold, (2) change the lifecycle stage from MQL to SQL, (3) send a notification to my team
Ultimately, if you have a strong end goal in mind, planning out the right workflow steps should be pretty painless (and maybe even a little bit fun!), but if you’re not prepared before you start building your workflow, it’s easy to lose sight of what you’re actually trying to accomplish.
Step 2: Choose the right workflow actions to accomplish your automation end goal
Ok… so we know how to get people through the door. The next question is: What happens when they come to the (workflow automation) party?
To create a workflow, navigate to your workflows tab in HubSpot and select “Create a Workflow” in the upper right.
Name your workflow, choose whether or not you want to start from scratch or use a template, and then hit “Next.”
Set your enrollment triggers (based on what you outlined in the previous step) and then simply press the “+” icon and then mix and match the actions until you accomplish your end goal.
Workflow delays can be a lifesaver.
For example, if I want to send a welcome message to all associated contacts once they sign a contract (i.e. an associated HubSpot deal reaches “closed won”) I would build a company-based workflow that looks something like this:

This example also demonstrates the strategic use of workflow delays. If a sales rep is working late and moves the deal to “closed won” on a Monday at 7 pm, you wouldn’t want the welcome email to go out immediately (and minimize the effectiveness of the message.)
We can use appropriately timed delays or even delay action until an event occurs to make sure our actions are firing at the right time for maximum impact. We can also use workflow settings (which we’ll discuss in the next section) to further fine-tune when workflow actions are executed.
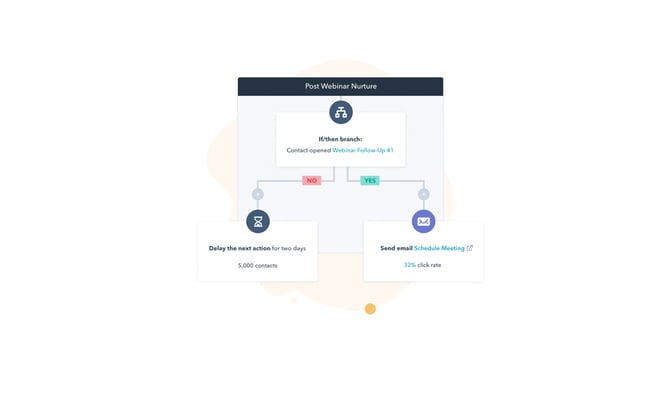
Another key workflow action strategy is if/then branch logic.
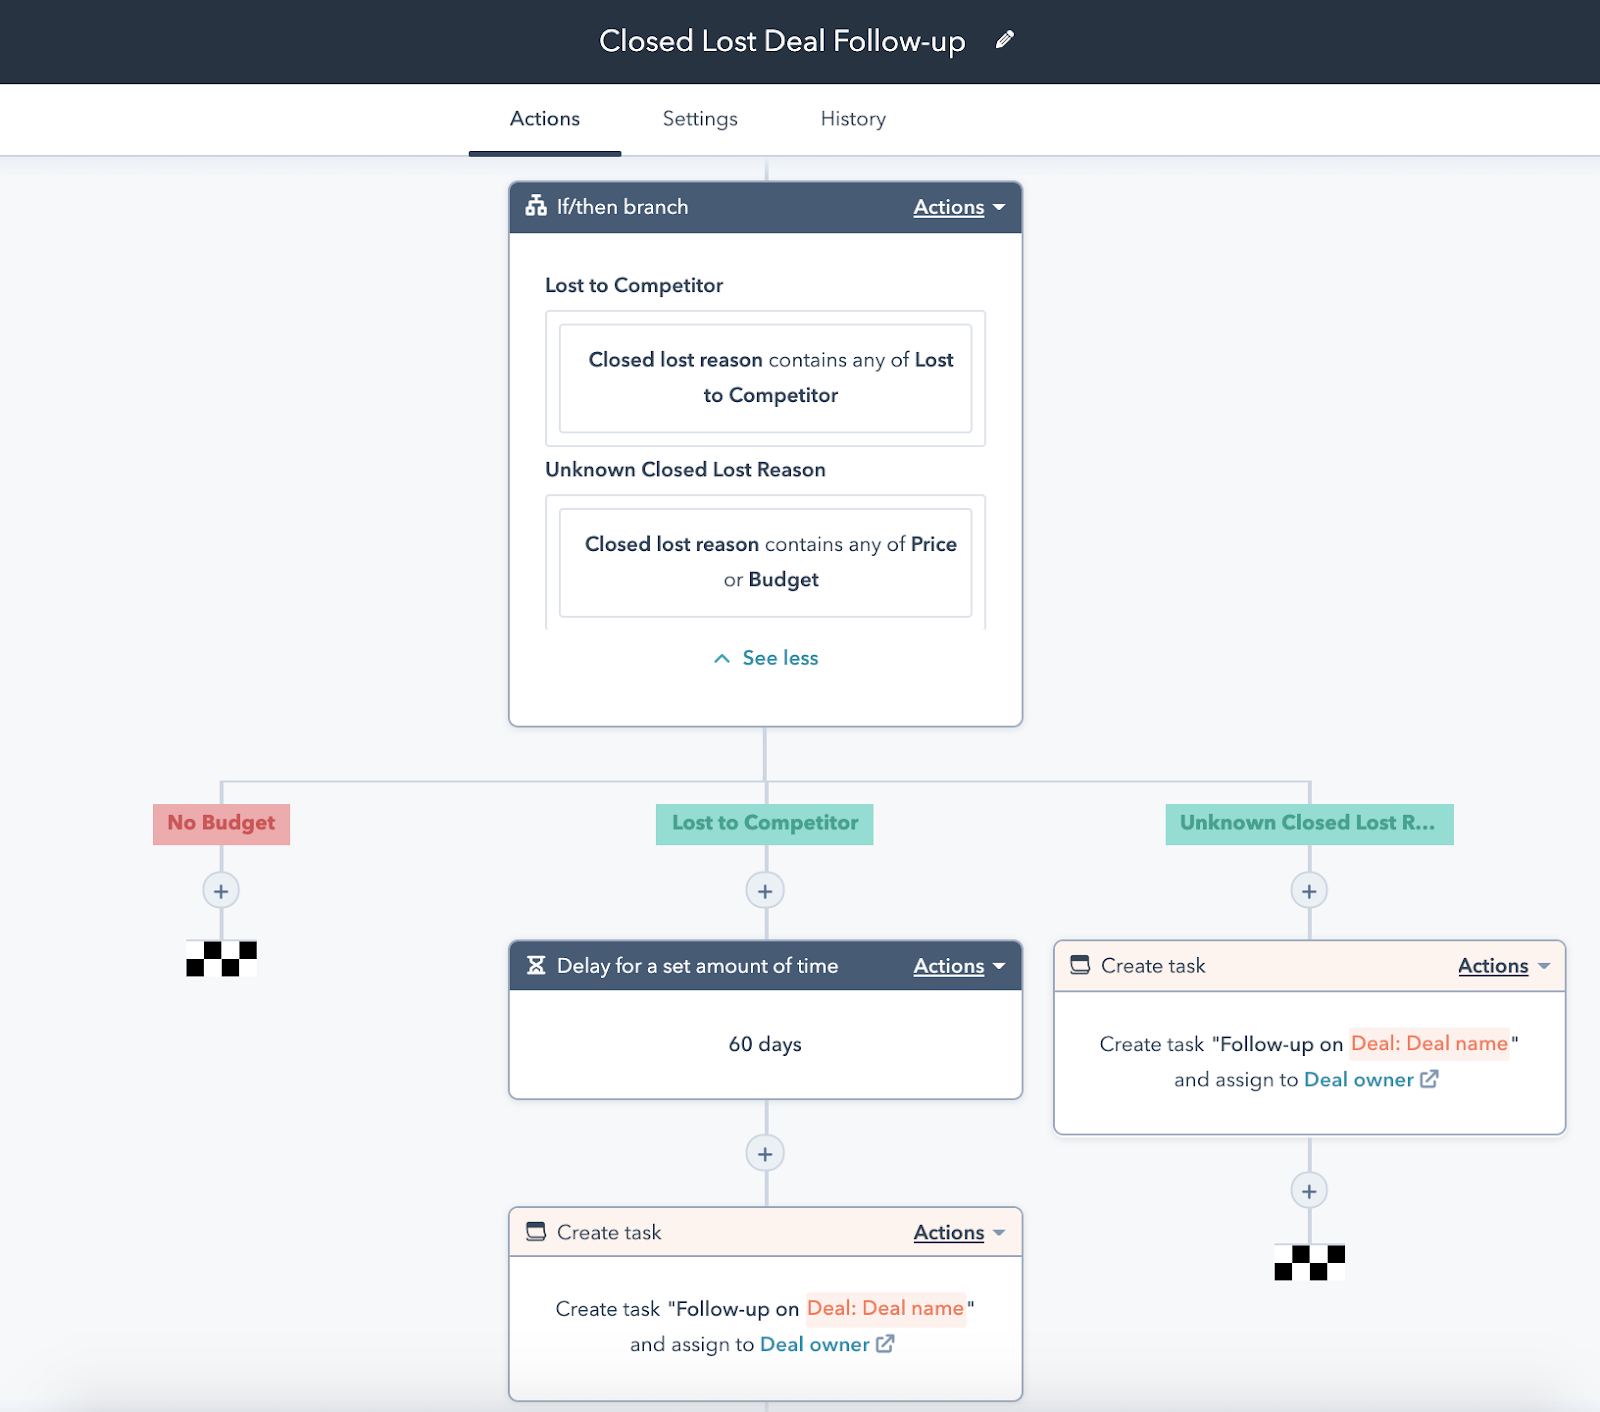
For example, imagine I want to tailor my post-sales outreach based on the reason a deal was marked closed/lost. I would create a deal-based workflow that used if/then branch logic to segment all closed/lost deals into three branches:
- Branch #1: “No Budget” — the prospective client didn’t have the budget to work with us (no immediate follow-up action required)
- Branch #2: “Lost to Competitor” — the prospective client went with one of our competitors, but I want to set a task for the sales team member assigned to this deal follow-up in 60 days to see if they’re still happy with that decision
- Branch #3: “Unknown Closed Lost Reason” — I don’t know the reason why I lost this deal, so I want the assigned sales team member to follow-up via email immediately for more feedback on the sales process
One final note, you also have the ability to add a comment to any workflow action. This simple step promotes collaboration and can save your team a lot of valuable time when trying to decipher what a workflow was designed to accomplish.
Step 3: Review your workflow settings to fine-tune your masterpiece
Now that we’ve inputted our workflow triggers and mapped out our workflow steps, we’re finally ready to turn it on, right?
Wrong!
There’s one more critical step you need to take before you’re ready to roll: adjusting your workflow settings.
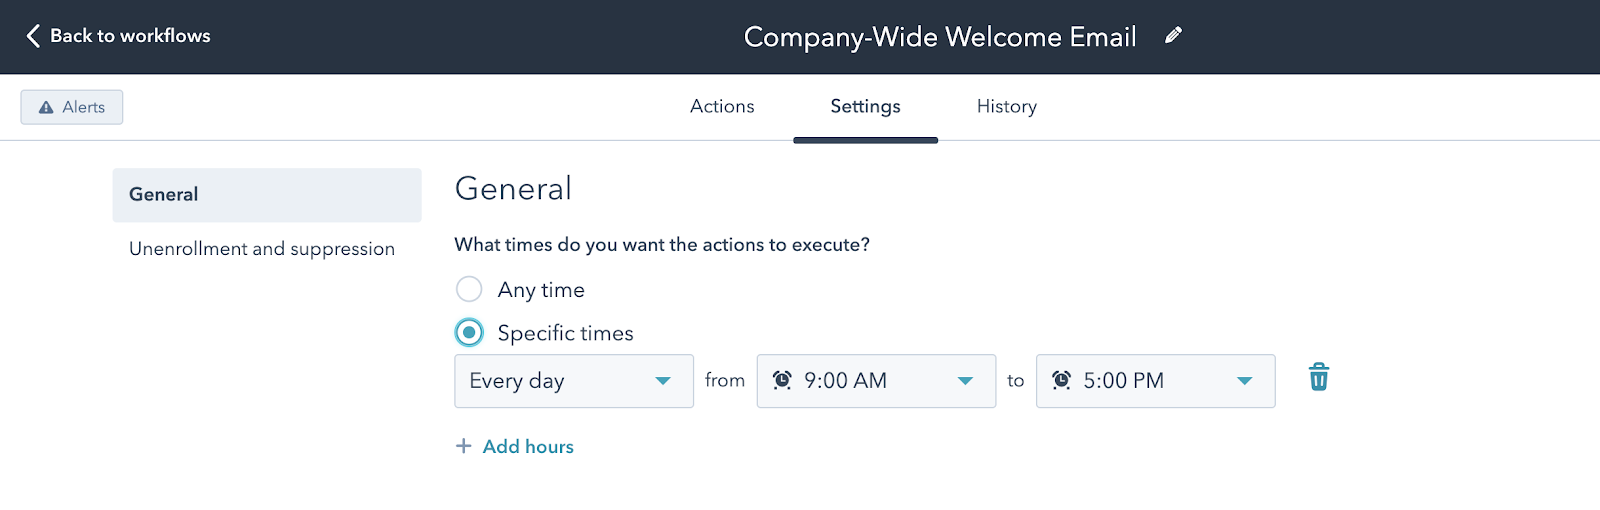
This process starts by navigating to the settings tab of your freshly created workflow — if you’re creating a company-based, deal-based, ticket-based, or quote-based workflow, you have two main settings to modify.
The first setting dictates when your workflow actions will execute. Do you want actions to occur at any time? Or do you need to limit these actions to a specific timeframe (ex: Monday - Friday, 9:00 AM - 5:00 PM)?
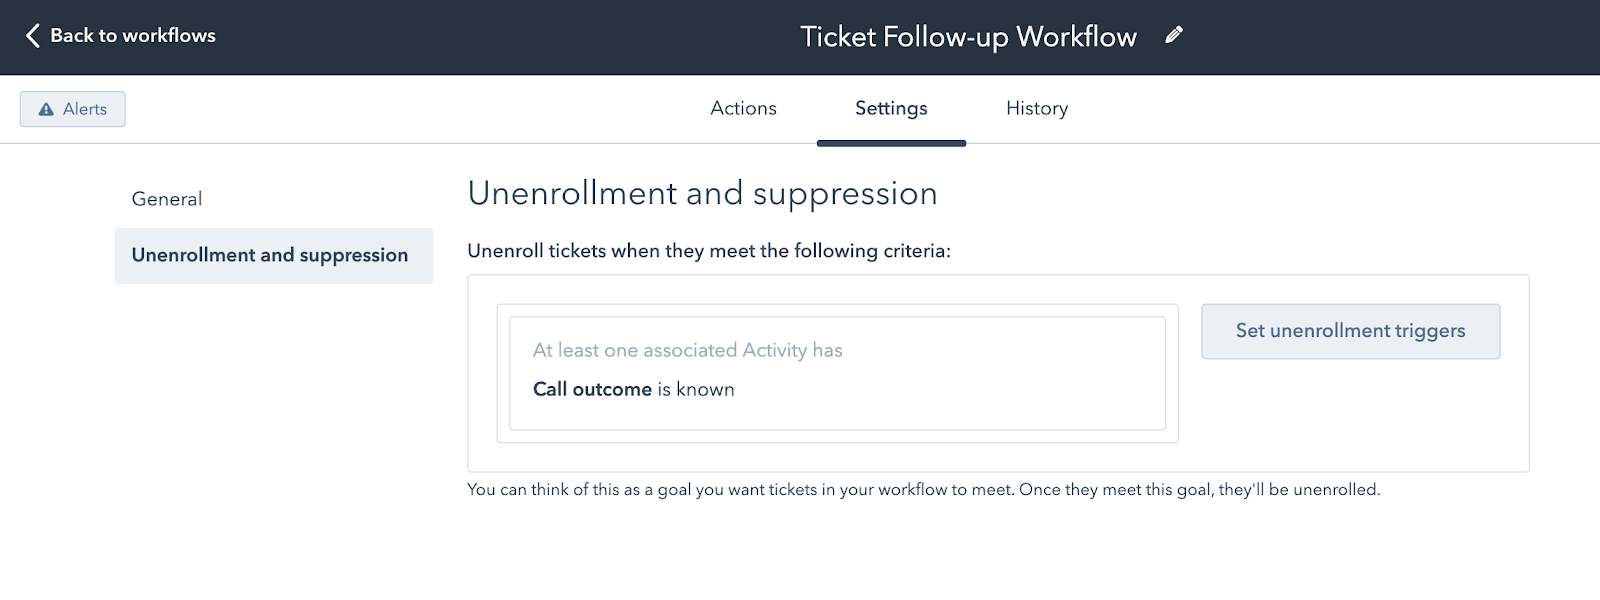
The second available setting for company-based, deal-based, ticket-based, or quote-based workflows is unenrollment and suppression criteria. You can think of this as the end-goal you want the enrolled object to achieve. Once this goal is met, the object will automatically be unenrolled.
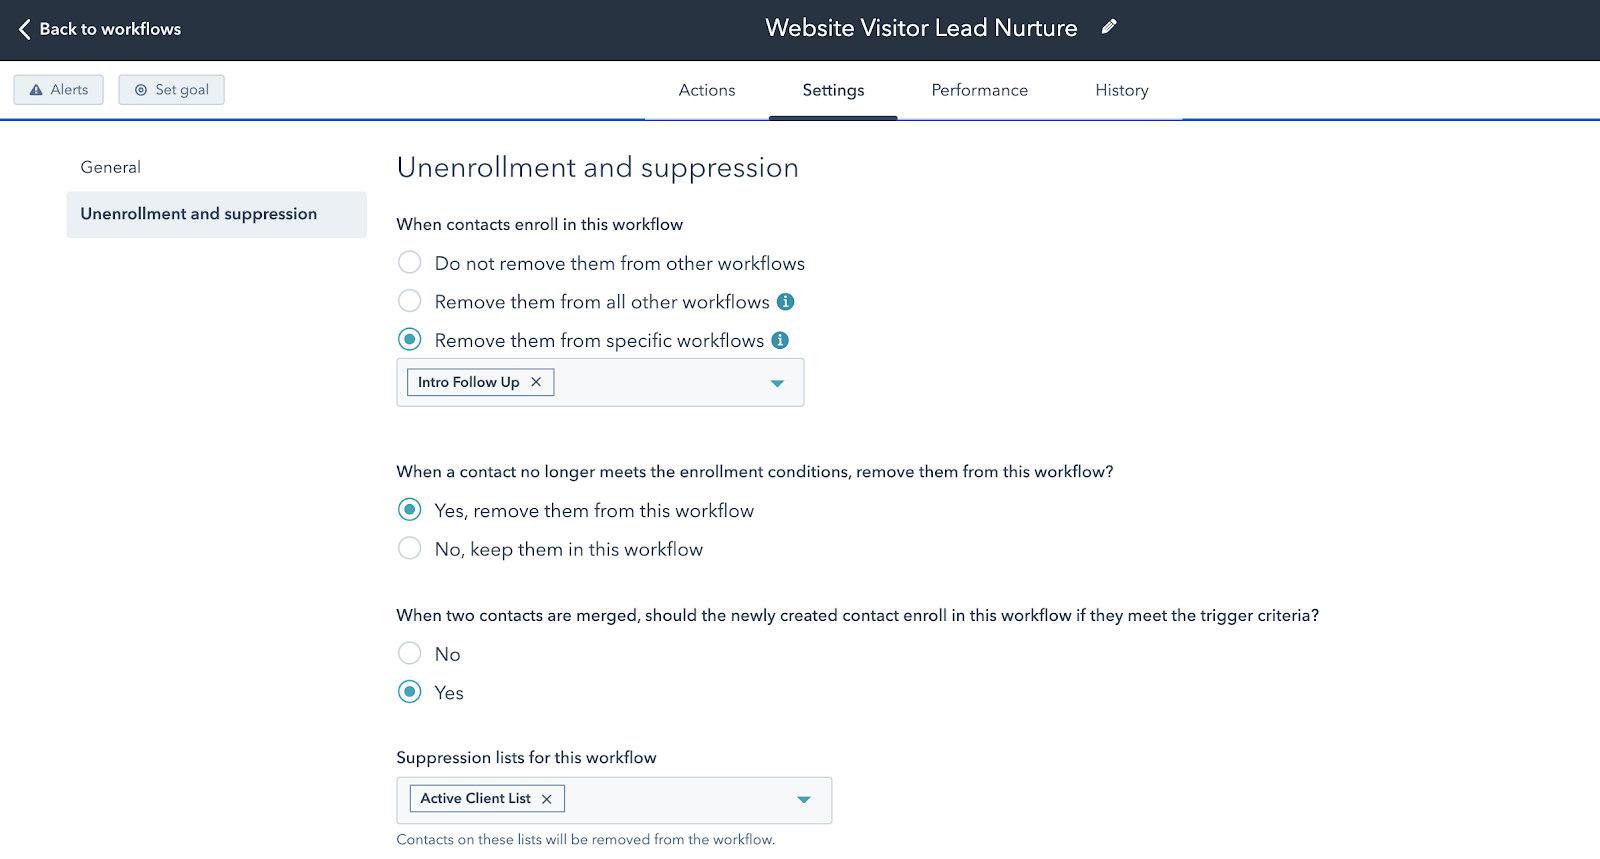
Contact-based workflows have additional settings to consider.
For example, you can decide if you want to allow workflow enrollment from Salesforce or you can choose to associate a contact-based workflow with a HubSpot campaign.
Contact-based workflows also have more options for unenrollment and suppression. You can opt to immediately unenroll contacts from other workflows when they enter your newly created workflow, you can also immediately unenroll contacts when they no longer meet the starting criteria.
Finally, if you’re using a contact-based workflow to nurture leads, you also have the option to set a workflow goal. A workflow goal allows you to focus your efforts on one main objective, and easily measure the success of your engagement.
For example, if I wanted to re-engage a list of cold leads and encourage them to book a connect call, I might set a workflow goal that looks something like this:
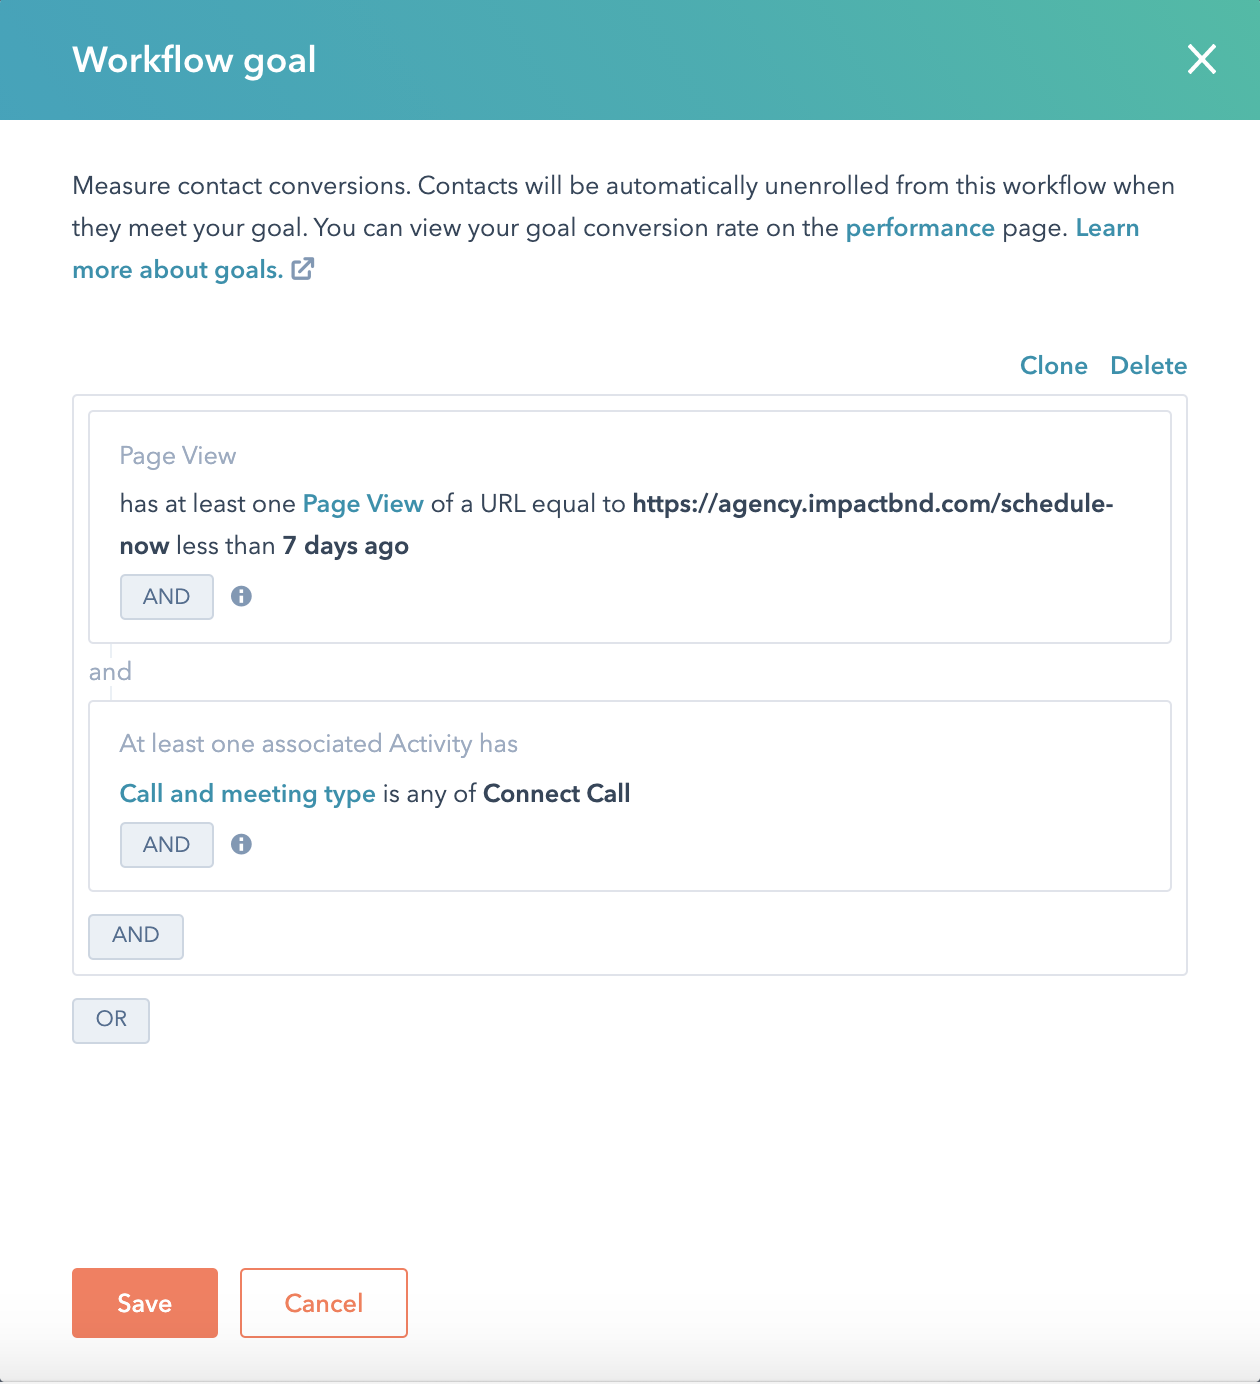
Once a workflow contact books a connect call via IMPACT’s “schedule now” landing page, the contact is automatically unenrolled from the lead nurture workflow. The contact will also be marked as a successful conversion in the goal conversion rate (which is tracked on the workflow performance tab.)
Not every contact-based workflow will have an easily definable goal, but it’s a great tool to track marketing KPIs for lead nurturing.
Step 4: Fire away when ready!
Finally, the moment has come. You’ve chosen your enrollment triggers, defined your workflow actions, and adjusted your settings. You’re ready to turn on your workflow!
To turn on your brand-new workflow, start by clicking the “review” in the upper right corner.
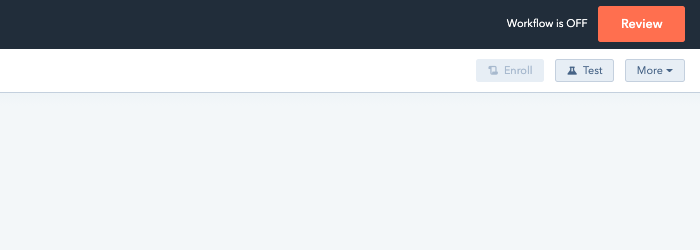
HubSpot will prompt you to review all relevant workflow settings (including enrollment, unenrollment, timing) and also ask one final question: Do you want to enroll contacts who currently meet the starting criteria when this workflow is turned on?
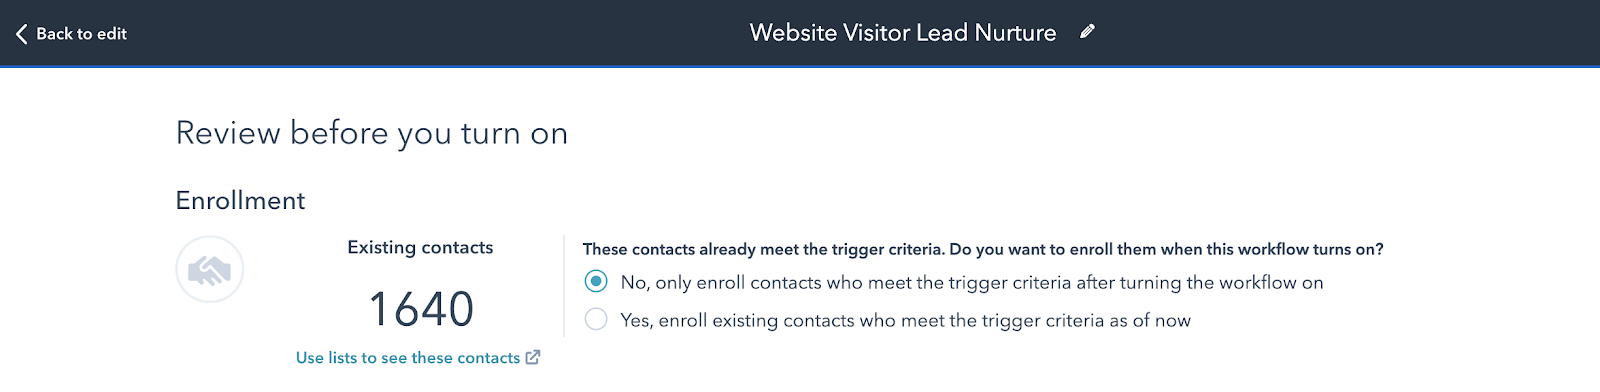
The inherent nature of your workflow will dictate the answer to this question.
If you’re trying to engage a list of old leads, yes, absolutely you want to enroll contacts who currently meet the enrollment criteria. However, if you’re trying to set follow-up tasks after a website visitor takes a key action, your sales team will hate you if you suddenly clog up their daily queues with 1,600 irrelevant tasks.
So think through this question and choose wisely.
Step 5: Monitor your workflow performance
Once you have a few workflows up and running, the next logical question is: Is it succeeding?
There’s no one “right” answer to that question, but there are certainly a few places to monitor your workflow results.
The performance tab allows you to see a high-level overview of contact-based workflow KPIs, including top metrics, goal conversion rate, contact trends, and email trends.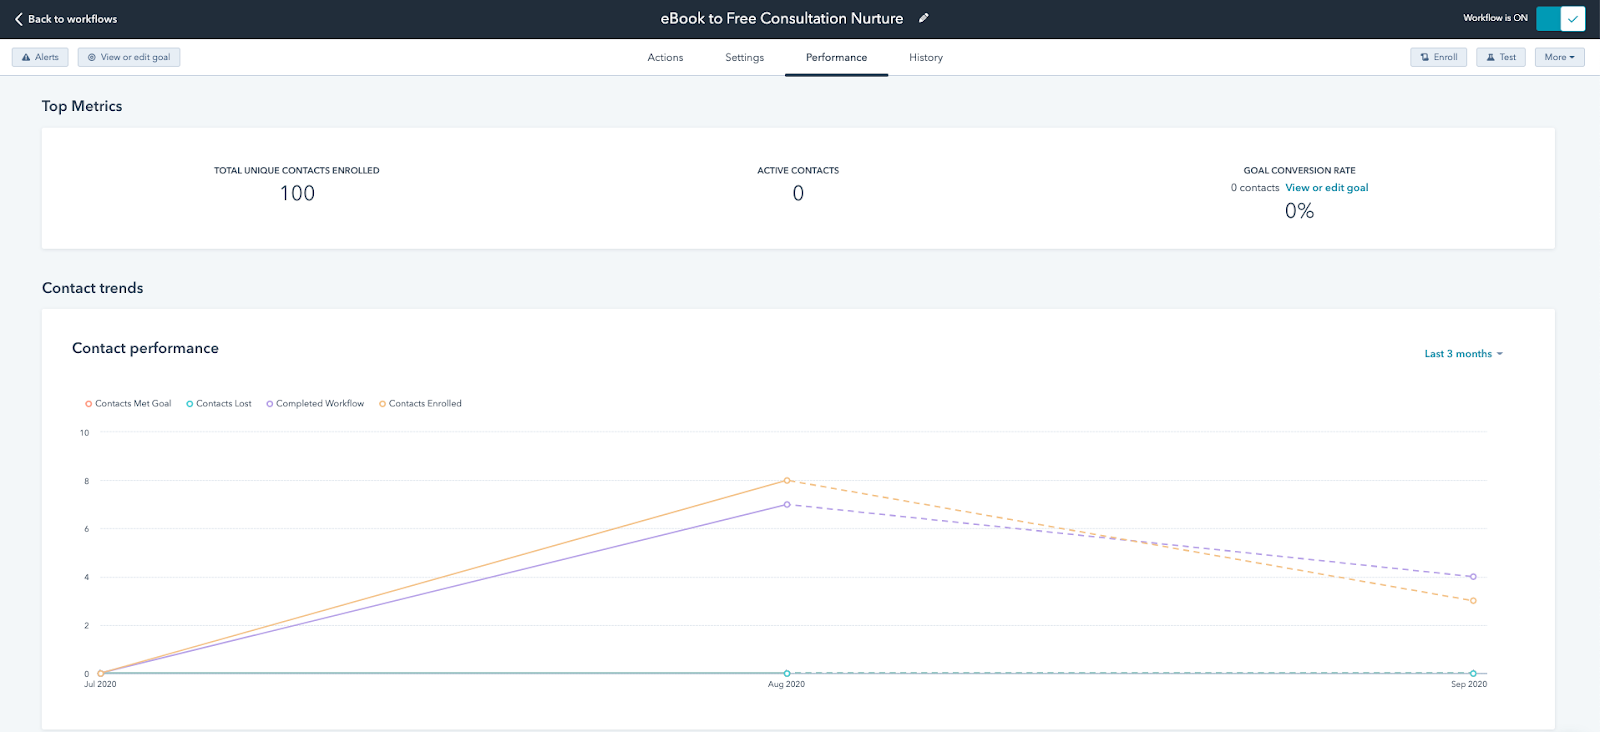
Monitor this tab on a regular basis to see if contacts are successfully completing all steps of the workflow, how nurture emails are performing in a side-by-side comparison, and if you are meeting your overall workflow goals.
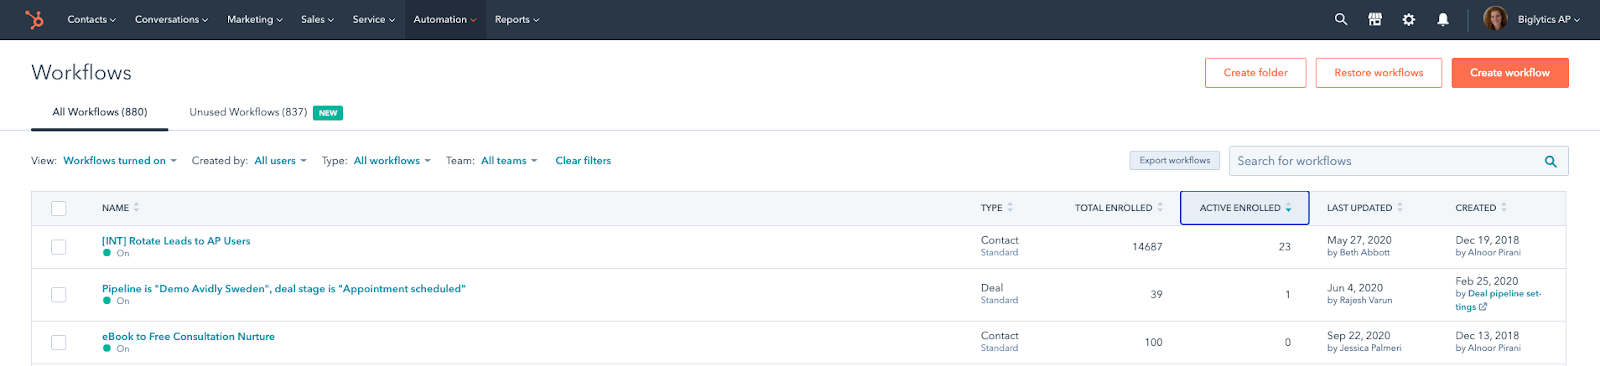
To compare workflow performance side-by-side, you can review total workflow enrollment and active workflow enrollment from the main workflow or automation tab in your HubSpot portal. This area of the tool also allows you to filter by workflows that are currently turned “on” and sort by workflow type.
Finally, if for some reason your workflow is not performing as expected, the first place you should go to diagnose the problem is the workflow history tab.
This section of the tool allows you to see a complete log of all workflow actions and a play-by-play of which HubSpot users have made updates to the workflow settings. You can filter workflow actions by time of execution, action type, and event type (i.e. was the execution successful, or was there an error that prohibited completion?)
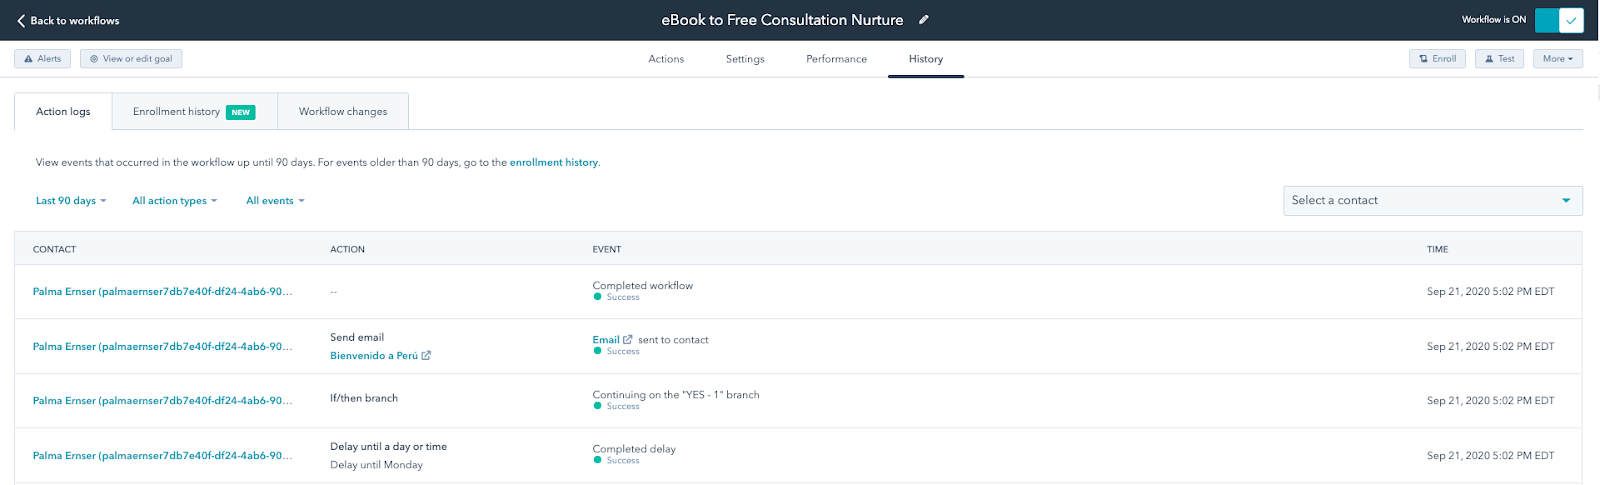
The history tab data is too granular to review on a regular basis, but it’s indispensable when trying to solve a marketing automation mystery.
Some final words of advice...
By now you should see that there’s a lot to discover when using HubSpot workflows.
While this area of your HubSpot portal can feel overwhelming (especially when you’re just learning the ropes), it’s also a powerful machine that can save you a lot of time and energy in your day-to-day marketing efforts.
When you’re ready to dive in, keep these final “dos and don’ts” in mind to ensure that you’re setting yourself up for marketing automation success:
- DO consider setting a marketing goal whenever possible. Tracking KPIs and celebrating small wins is essential when adopting a new approach. If you’re just getting started with lead nurturing, setting a clear objective and reporting back to colleagues can be an easy way to demonstrate the value of marketing automation in your organization.
- DON’T forget to test your workflow before you turn it on (and make sure to use a test contact, not a real contact in your database.) You need to understand the consequences of turning on your workflow, and the best way to do that is to learn how to test your automation before unleashing it into the wild.
- DO closely monitor key metrics in the performance tab to iterate on your workflow design. As much as we like to tell ourselves that workflows are a “set it and forget it” solution to everyday marketing challenges, the truth is that a well-designed workflow is never done. If you monitor workflow performance, you can easily identify new areas to optimize and endlessly iterate on your marketing automation efforts.
- DON’T forget to leave notes for your colleagues. This simple tool can save you a lot of hassle when working with a larger team (and is especially helpful if someone leaves the organization or moves on to another department.)
- DO keep your workflows tab clean and organized. Some workflows can run in the background for years, while others are designed to accomplish one quick fix. Keeping a current workflows tab helps your team prioritize and monitor your most important marketing automation efforts (while deleting any old or outdated workflows that may be getting in the way.)
- DON’T forget that there’s always an undo button. If you happen to hit delete by mistake, HubSpot allows you to restore previously deleted workflows for up to 90 days.
With this comprehensive guide, a goal, and a well-defined plan of attack, you’re well on your way to marketing automation mastery. But if you need a little more guidance, you can always check out Caria Duffy’s course in IMPACT+.
Featured Image Source: HubSpot
Order Your Copy of Marcus Sheridan's New Book — Endless Customers!
/Assets/Icon%20Library/x%20corp.svg)
/Assets/Icon%20Library/whatsapp%20logo.svg)
/Assets/Icon%20Library/Email.svg)
/Assets/Icon%20Library/Arrows/Grey%20Arrow%20-%20Prev.svg)
/Assets/Icon%20Library/Arrows/Grey%20Arrow%20-%20Next.svg)