






How to improve my website
- Have a plan
- Remove distractions and reduce friction
- Add social proof
- Implement calls-to-action
- Use the right stock images
- Organize your navigation
- Let your visitors scroll on your homepage
- Don’t be afraid of white space
- Make mobile optimization a must
- Make pricing easy to find
- Create a self-service experience
- Test and iterate
Originally written by Christine Austin. Updated by Bob Ruffolo with support from the IMPACT editorial team.
Last updated: October 29, 2026
Within five seconds of landing on your website, can your visitors tell what your company does? Could they easily find your blog if they needed it? Is your pricing easy to understand? Do people stay long enough to take a next step?
If you're answering "no" to any of these questions, it's time to take a hard look at how your website is designed and maintained.
A website works best when its design supports the user experience, functions well, and complements your content.
It's easy for even a professional website designer to treat these things as low priorities. But a successful website needs both strong content and an experience that makes that content easy to find, read, and act on.
The last thing you want is to spend time writing great content for your blog or service pages, only for it to go unnoticed because of design flaws, navigation issues, confusing layouts, or missed conversion opportunities.
Website user experience covers a lot of ground, and it can be hard to know what to tackle first.
Here are 12 tips to help you prioritize your improvements and make sure your design isn't turning visitors away.
1. Have a plan
Once you've acknowledged that your site needs some improvements, work backward and create a plan for how you'll tackle them.
Start by mapping out your customer journey, from the first time someone visits your website to the moment they become a customer.
As you do this, think about which pages they're going to view, what content they're going to read, and what offers they're going to convert on. Understanding this will help you design a site that actually helps people move from learning to buying.
I've always liked Leadfeeder's customer journey map as an example. You don't need to make yours as graphical as they did, but it gets the point across. It illustrates what users did when visiting their website and what those who did and did not become customers had in common.
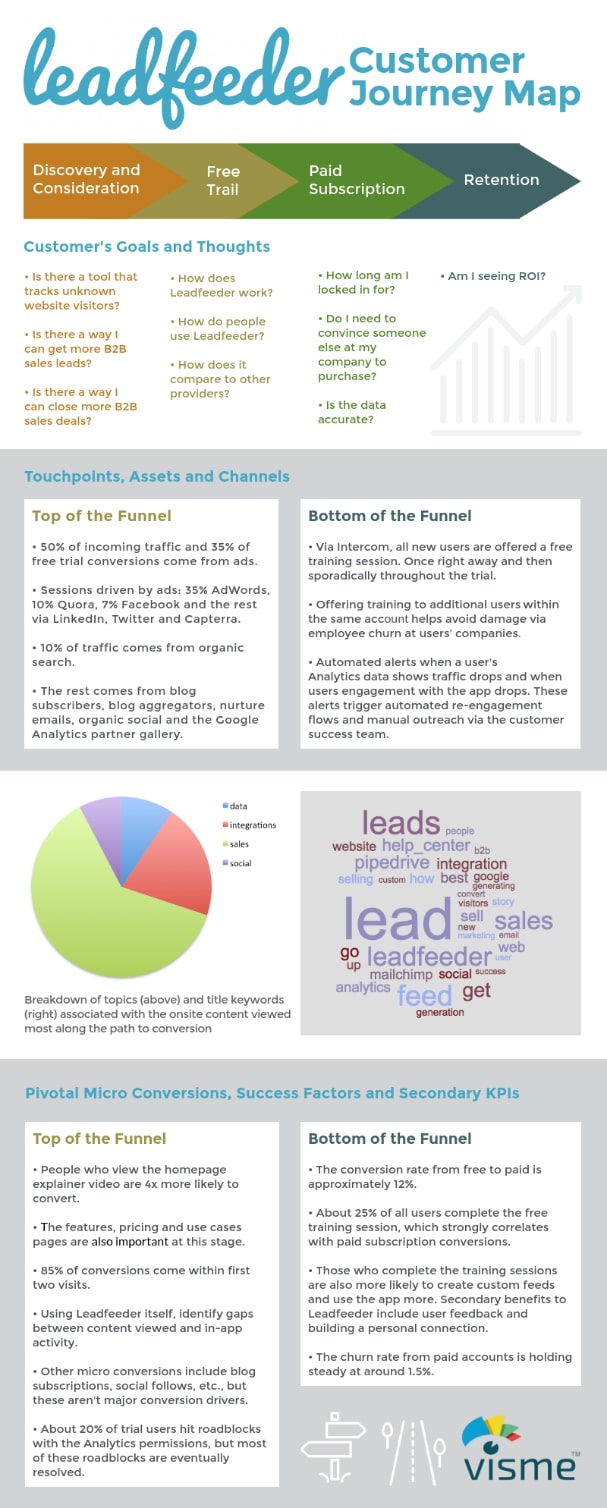
If you're struggling to compile this data, or you lack a CRM that would make researching it easier, you can always interview your customers. Ask if you could have 15 to 30 minutes of their time to ask them a few questions (you can even thank them with a small gift card). Interview as many people as you can, but there's no need to go overboard.
Then, use this data to map out your strategy. This will help you identify the key touchpoints of your website, the areas your users interact with.
For each of these touchpoints, you should be able to map out the emotions, thoughts, goals, pain points, and opportunities it needs to address.
Answering these questions will help you direct your design. Is there imagery that will best address these areas in the way you want? What about a particular color palette? Your customer journey map will help you answer these questions and reinforce your design.
2. Remove distractions and reduce friction
Certain elements on your website are going to detract from the value and message you're trying to convey. Complicated animations, content that's too long, and generic "stocky" website images are just a few examples.
Visitors decide quickly whether a page is worth their time, so make it clear what they'll learn or be able to do on each page, and make sure your design doesn't get in the way.
This starts with making sure you have consistent brand guidelines you can work from.
Your guidelines should detail your font styles, colors, imagery, iconography, and logo usage. Without them, it's easy to end up with arbitrary colors and varying font styles and sizes, which can distract from your message or create visual confusion for people trying to convert.
It's also important to avoid too many on-page animations or interactions. If every button on a page is pulsing, or a section of icons each has its own animation, it can feel overwhelming and distract visitors from reading what's on the page.
Let's look at an example. Since I'm treating this as a critique, I've removed the brand's logo from the image so the company can remain anonymous.
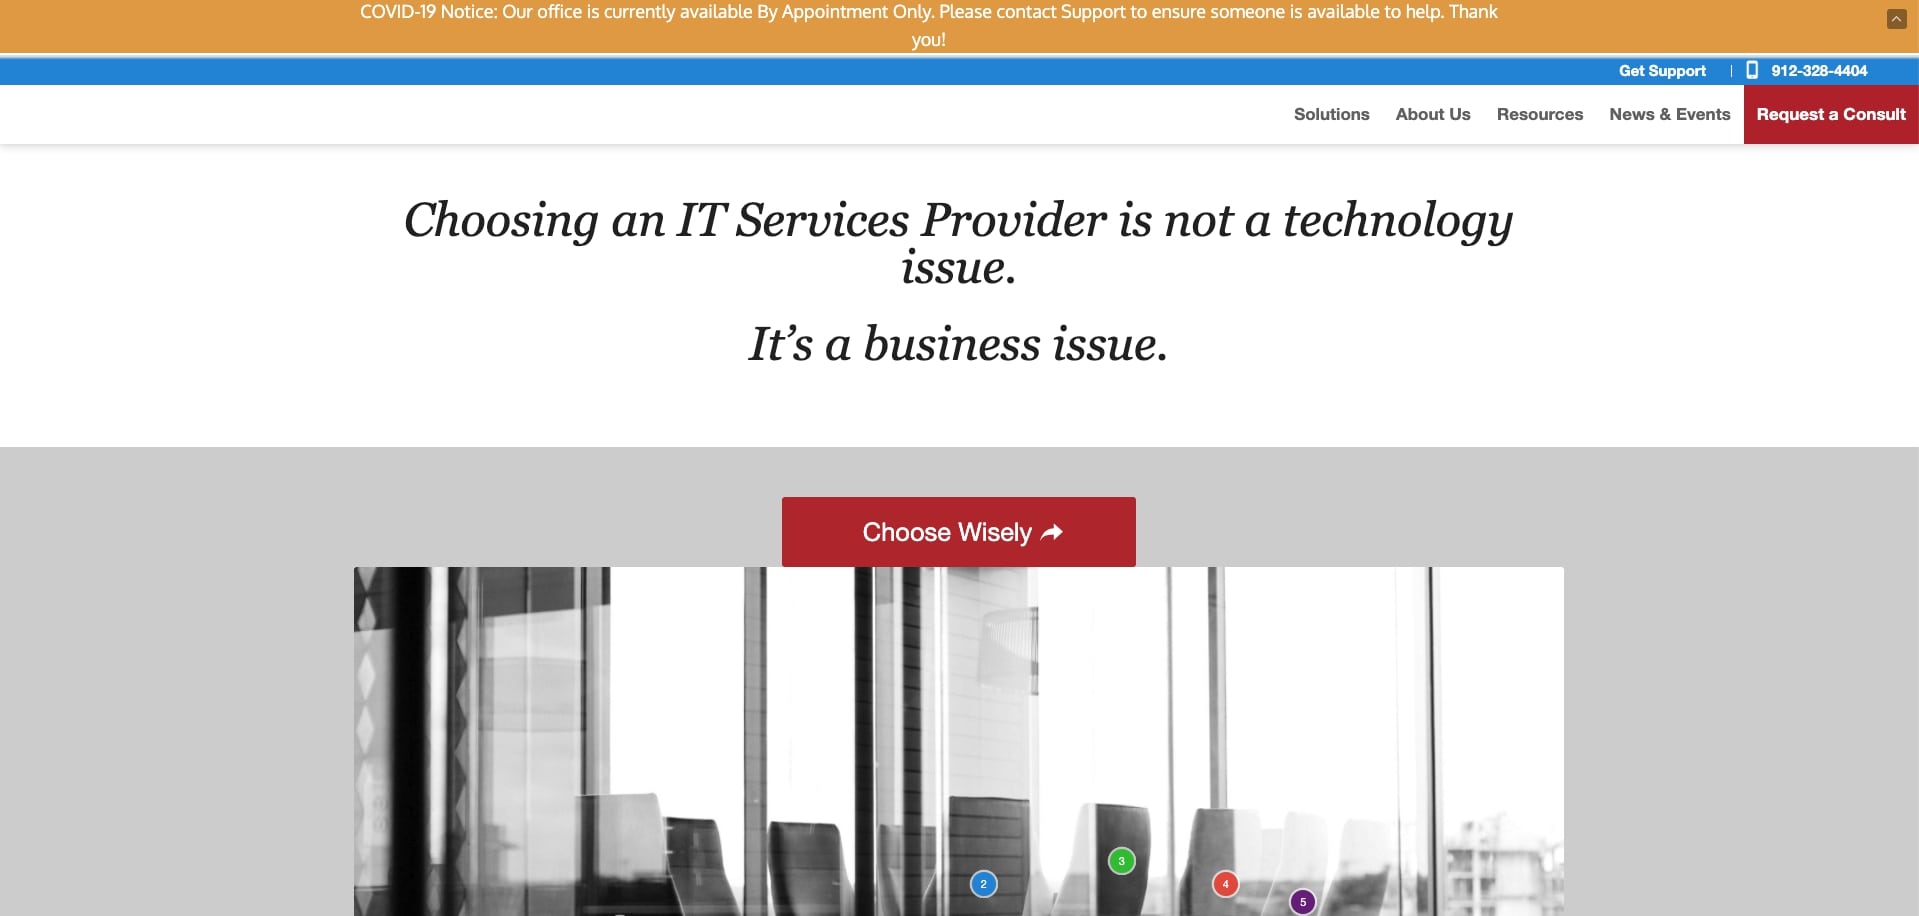
When looking at this site, the first thing I noticed was the colors.
The way they're used makes it hard for the user to decide where their eye is supposed to go. Should it be one of the two red buttons? What about the hello bar? Or maybe the top of the navigation?
You need to decide where you want visitors' attention to go when they arrive on the page and the order in which it should naturally flow. This color arrangement creates friction instead.
Second, there are some areas of inconsistent spacing. The single word left hanging in the hello bar ("you!") creates a second line that could easily be fixed by widening the container around the text. The H1 also isn't vertically centered in the white area, drawing your eye to "issue" rather than to the bulk of the message.
In the grey section below the header, the page leads with a button that doesn't have much context and feels sandwiched on top of an image. As a user, I'm left to wonder whether it's supposed to have space below it or relate directly to the image. Did the site just load incorrectly? That internal debate creates friction and confusion.
Now let's look at a page that offered a better user experience and followed its brand guidelines when this article was first published.
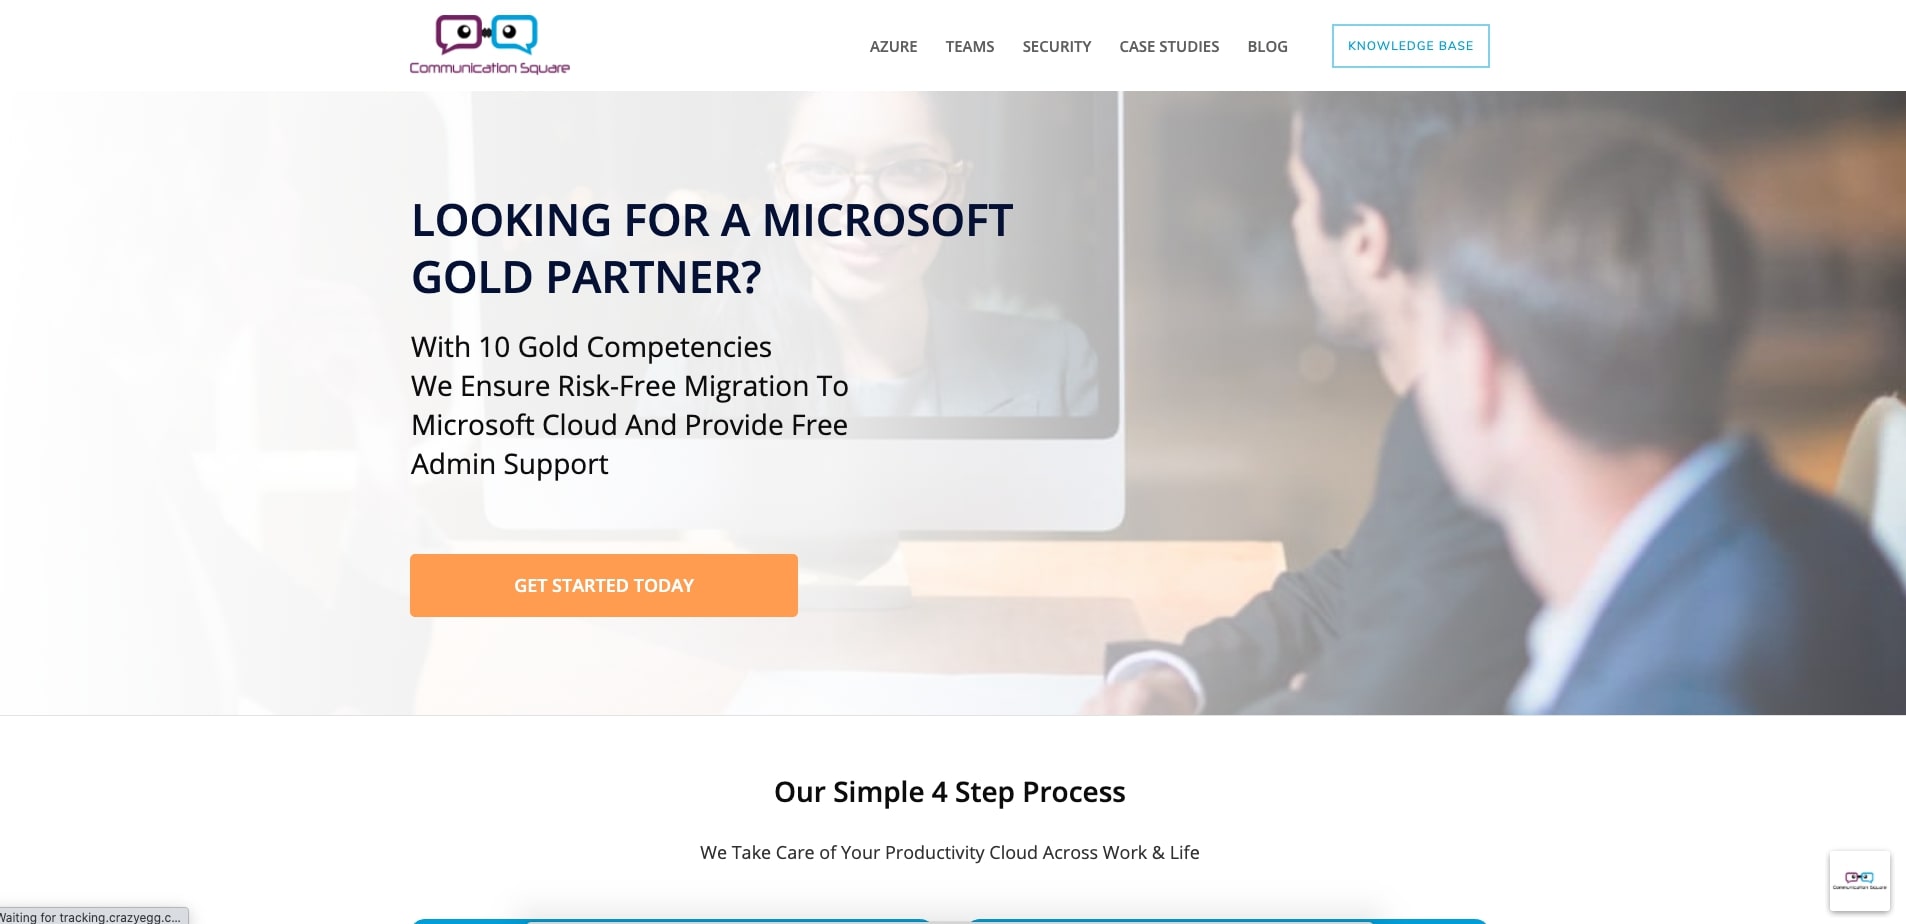
Above is Communication Square, a company in the IT space. At first glance, the site has a much cleaner look and feel, with fewer bold colors and more white space.
When it comes to colors, I like how Communication Square used two button colors: one for lower-priority, top- or middle-of-the-funnel actions (blue) and one for the bottom-of-the-funnel action (orange). As a result, my eye immediately goes to the orange, the more important action they want me to take.
Their fonts also feel much more cohesive. There appears to be only one font family, used in a light, medium, or bold weight. This creates uniformity and makes everything work together nicely.
The hero image also offers little room for distraction. Because the image itself isn't too detailed and is masked with a white overlay, the content stands out rather than disappearing into the image.
Details like these can make or break your website experience. They help users understand what you want them to do and leave less room for confusion.
3. Add social proof
If you shop like most people on Amazon, you probably gravitate toward products with mostly four- and five-star reviews from people who wrote about their experiences.
Those reviews help you trust that the product will do what it promises and what you need it to do, which makes you more comfortable buying it.
The same principle applies to your products, services, and website. Genuine testimonials from real customers help prospects trust that you can deliver what you promise.
So how should your testimonials look so they build that trust?
There are a few strategies you can take. First, decide which format you want: text or video. Video testimonials tend to hold attention longer and build a stronger human connection, because visitors can hear the voices and see the faces of real people.
Text testimonials, when designed and placed well, will still help build trust with your users.
When this article was first published, Upland Adestra, an email and marketing automation software company in the United Kingdom, had four videos on its testimonial page, each contained in its own section.
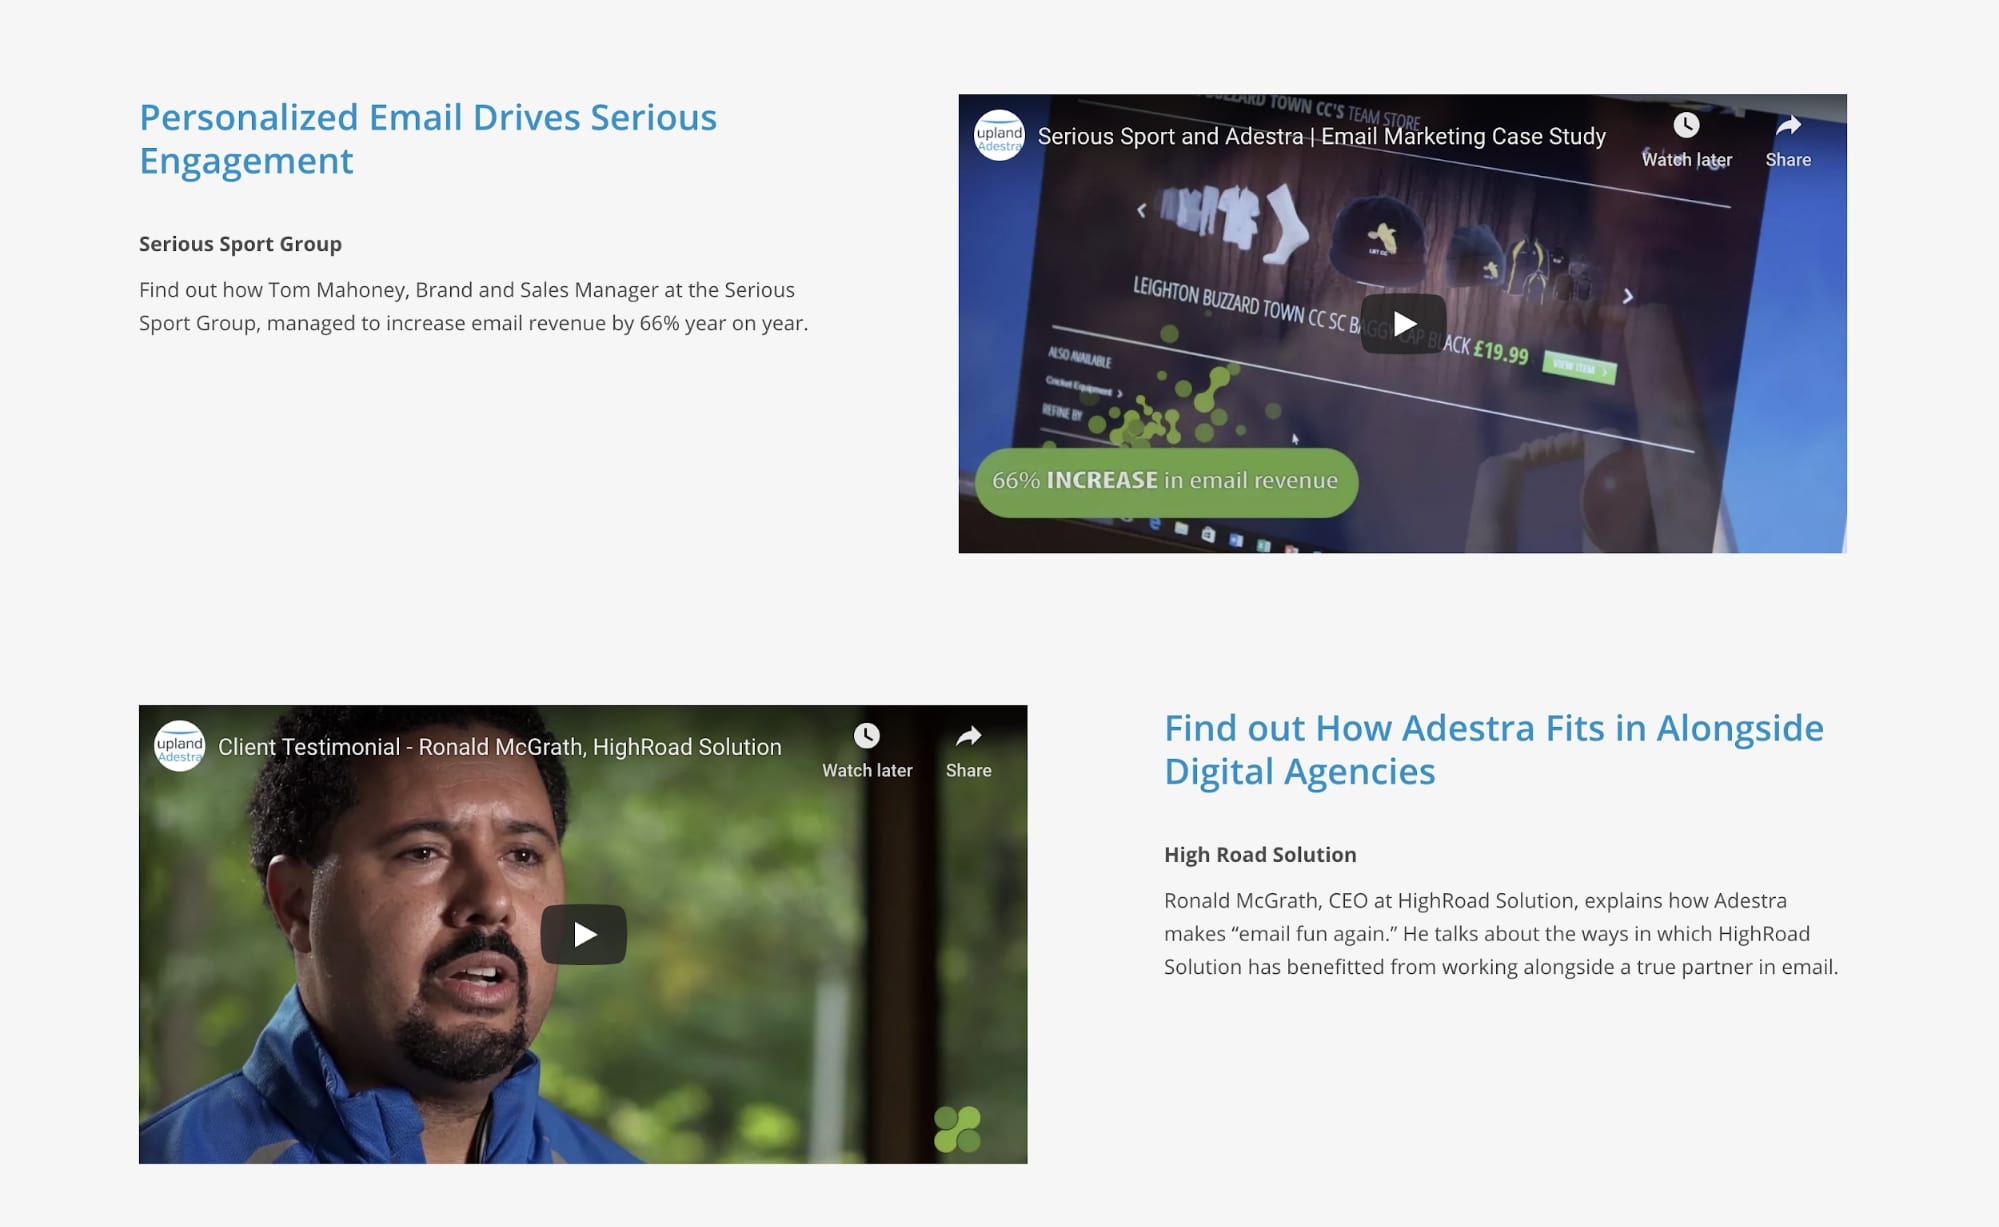
Rather than placing all the videos next to each other, Upland separated them and gave each a header and a sentence describing the result or benefit the client saw. That gives users context for what they'll hear in each video.
I also like how several of the video thumbnails show someone talking, which reassures users that they'll likely hear from the client directly rather than watch a text-based video.
If you don't have video testimonials yet, you may have a case studies page, where you can describe in detail how you helped your clients.
Zenefits (now part of TriNet) did this well on its website when this article was first written.
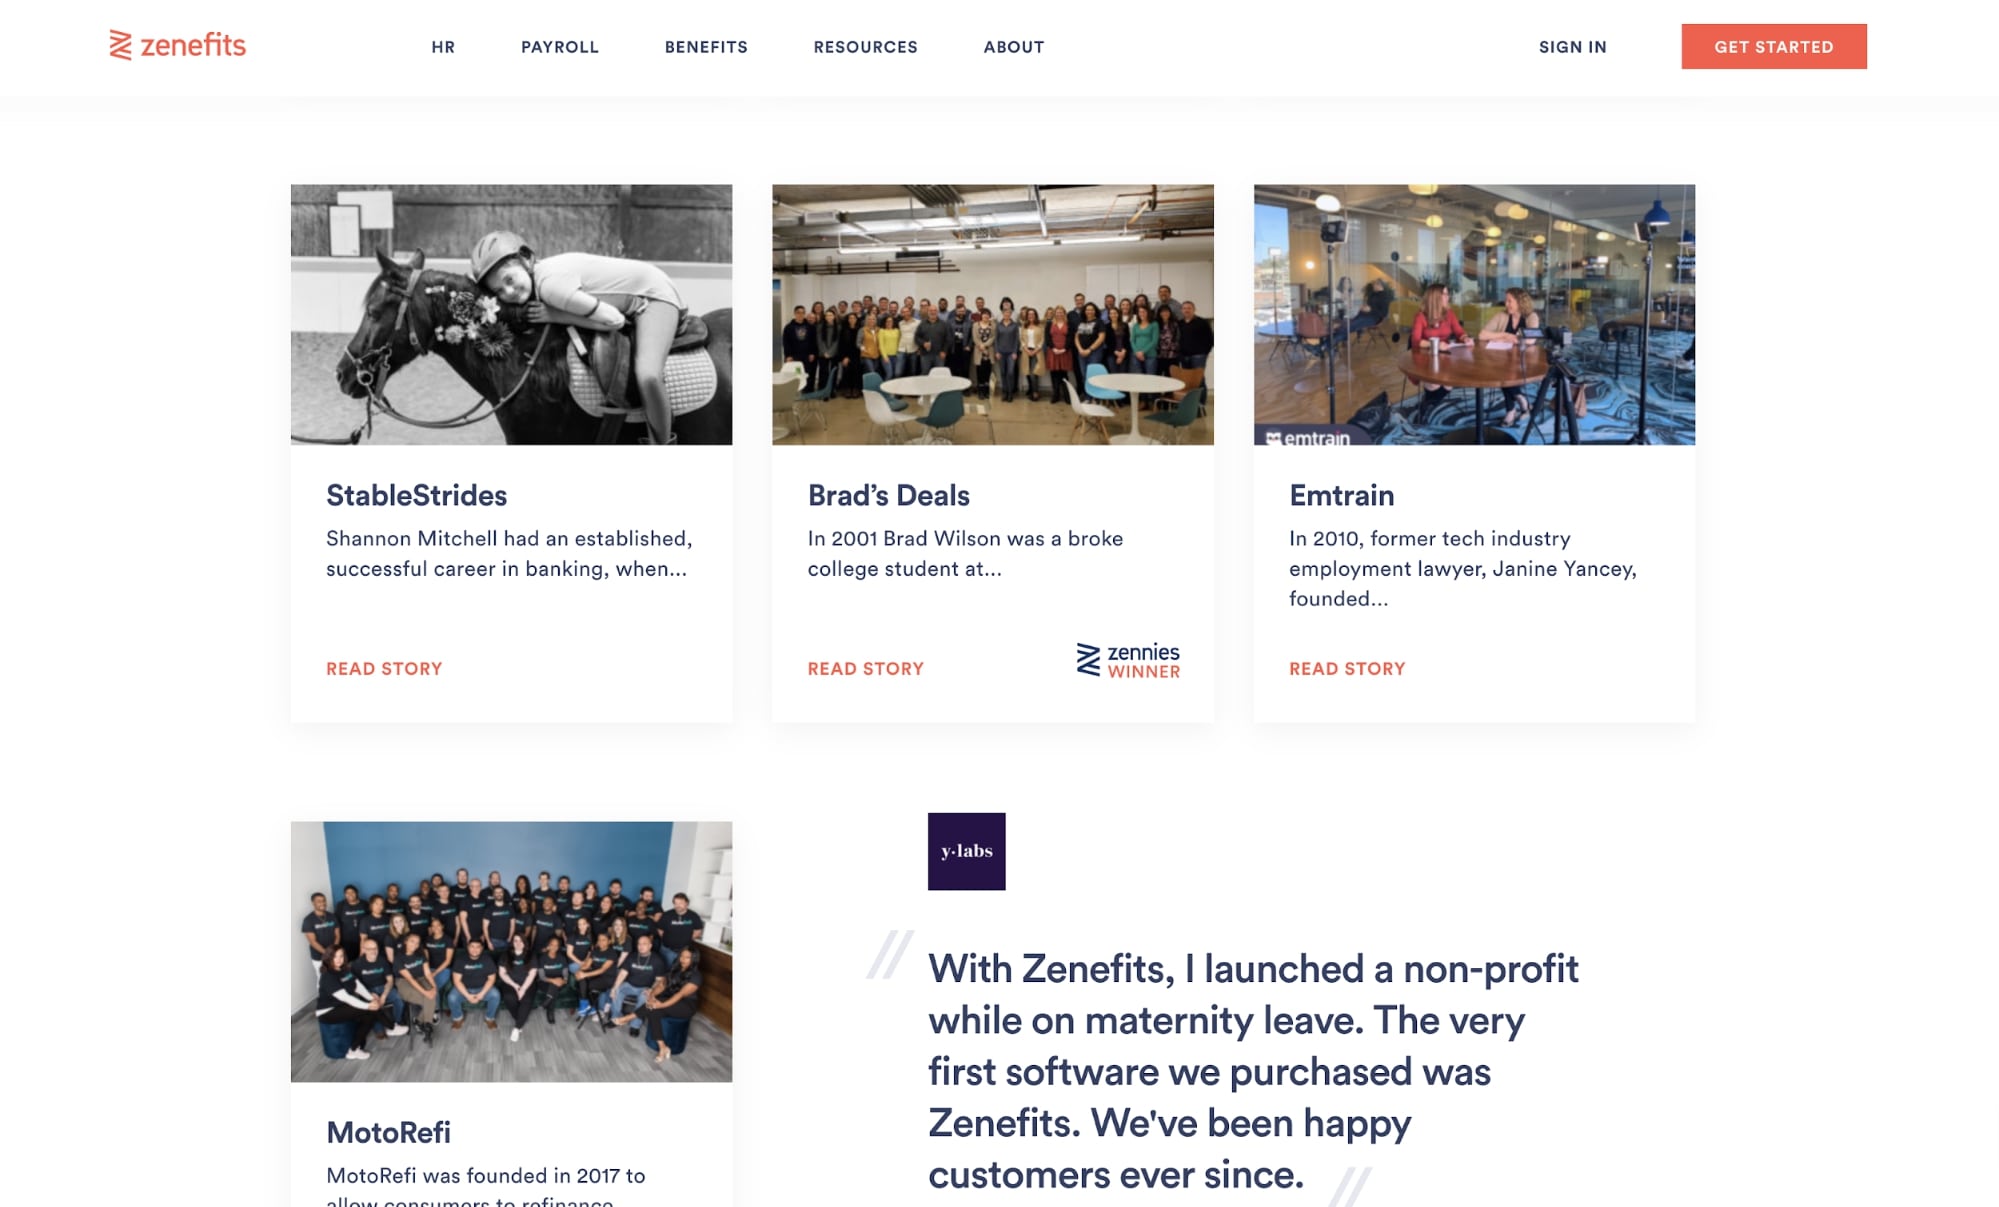
Each card featured an image of people from that client company, which is far more trustworthy than a stock photo or a logo on its own.
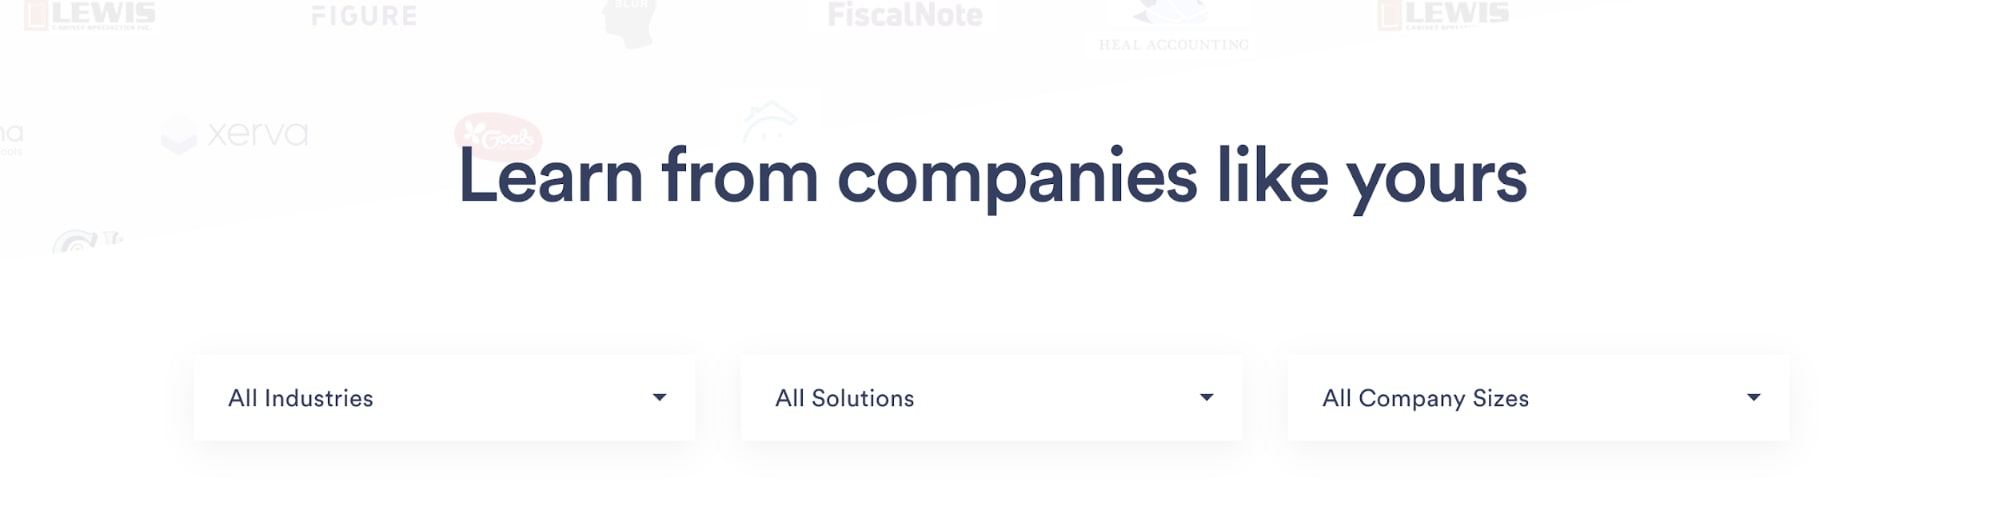
Because there were five pages of case studies, Zenefits added a filter at the top of the page so users could narrow results by industry or solution and find relevant stories faster.
Finally, if your site only has text testimonials and no case studies, design them carefully.
A quote with only a name attached is less likely to be believed. It leaves users wondering what company the person works for, what their job title is, and what they look like (which helps confirm the person is real).
Here's an example of a testimonial section from Drift's website in 2022. Drift has since been acquired by Salesloft, but the format still shows what to include.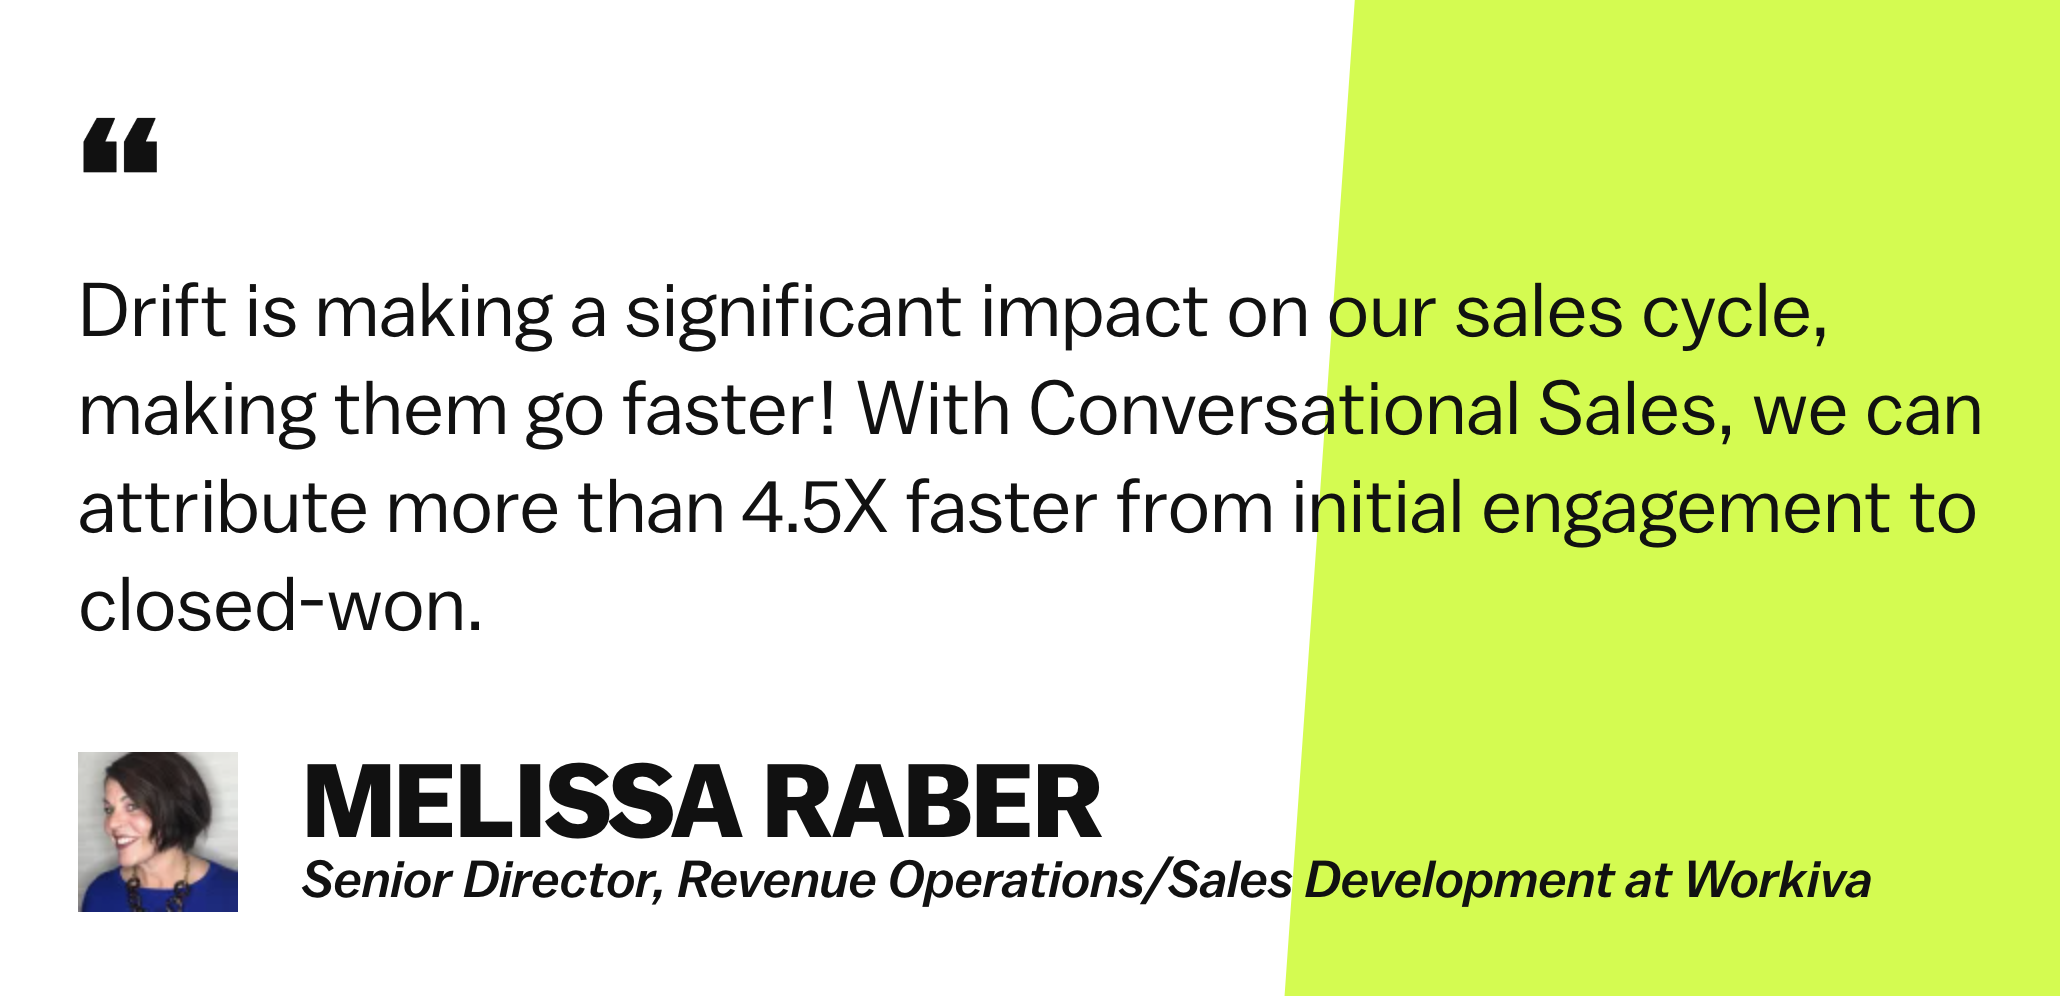
When it comes to where to include testimonials, I always recommend your homepage, your service pages, and a dedicated testimonial page in your navigation. These are the places where people are learning about your company and considering whether to buy.
As long as they're genuine, testimonials will improve your website experience and build trust with prospects before they become clients.
4. Implement calls-to-action
Once visitors land on your site (often through the blog or homepage), guide them to the pages that will help them make a decision. Make it easy for them to find what they're looking for so they don't have to hunt for the next step.
One of the best ways to do this is with well-placed calls-to-action in areas such as the top right of your navigation, below sections that ask the reader to act, and at the bottom of your pages.
But don't lose sight of your buyer's journey. The easy thing to do is show the most bottom-of-the-funnel (BOFU) call-to-action everywhere, but if someone isn't ready to buy, they'll likely take no action at all.
Instead, meet visitors where they are based on the page they're viewing.
For example, if someone is reading about the materials used to build a custom closet, they're likely still educating themselves. Rather than pushing a "contact us" call-to-action, offer them a comprehensive guide to custom closet materials. They'll be more likely to convert because it addresses their current concern.
Here's a real example from our own blog.
Readers of an article titled "8 Obvious Reasons You Need a Website Redesign (But Are Still Ignoring)" were likely considering a website redesign and trying to confirm whether it was the right decision. So it made sense to show them a call-to-action that would help them learn more.
When this article was first written, we offered those readers a guide to redesigning their website, where they could find answers to most of their questions in one place.
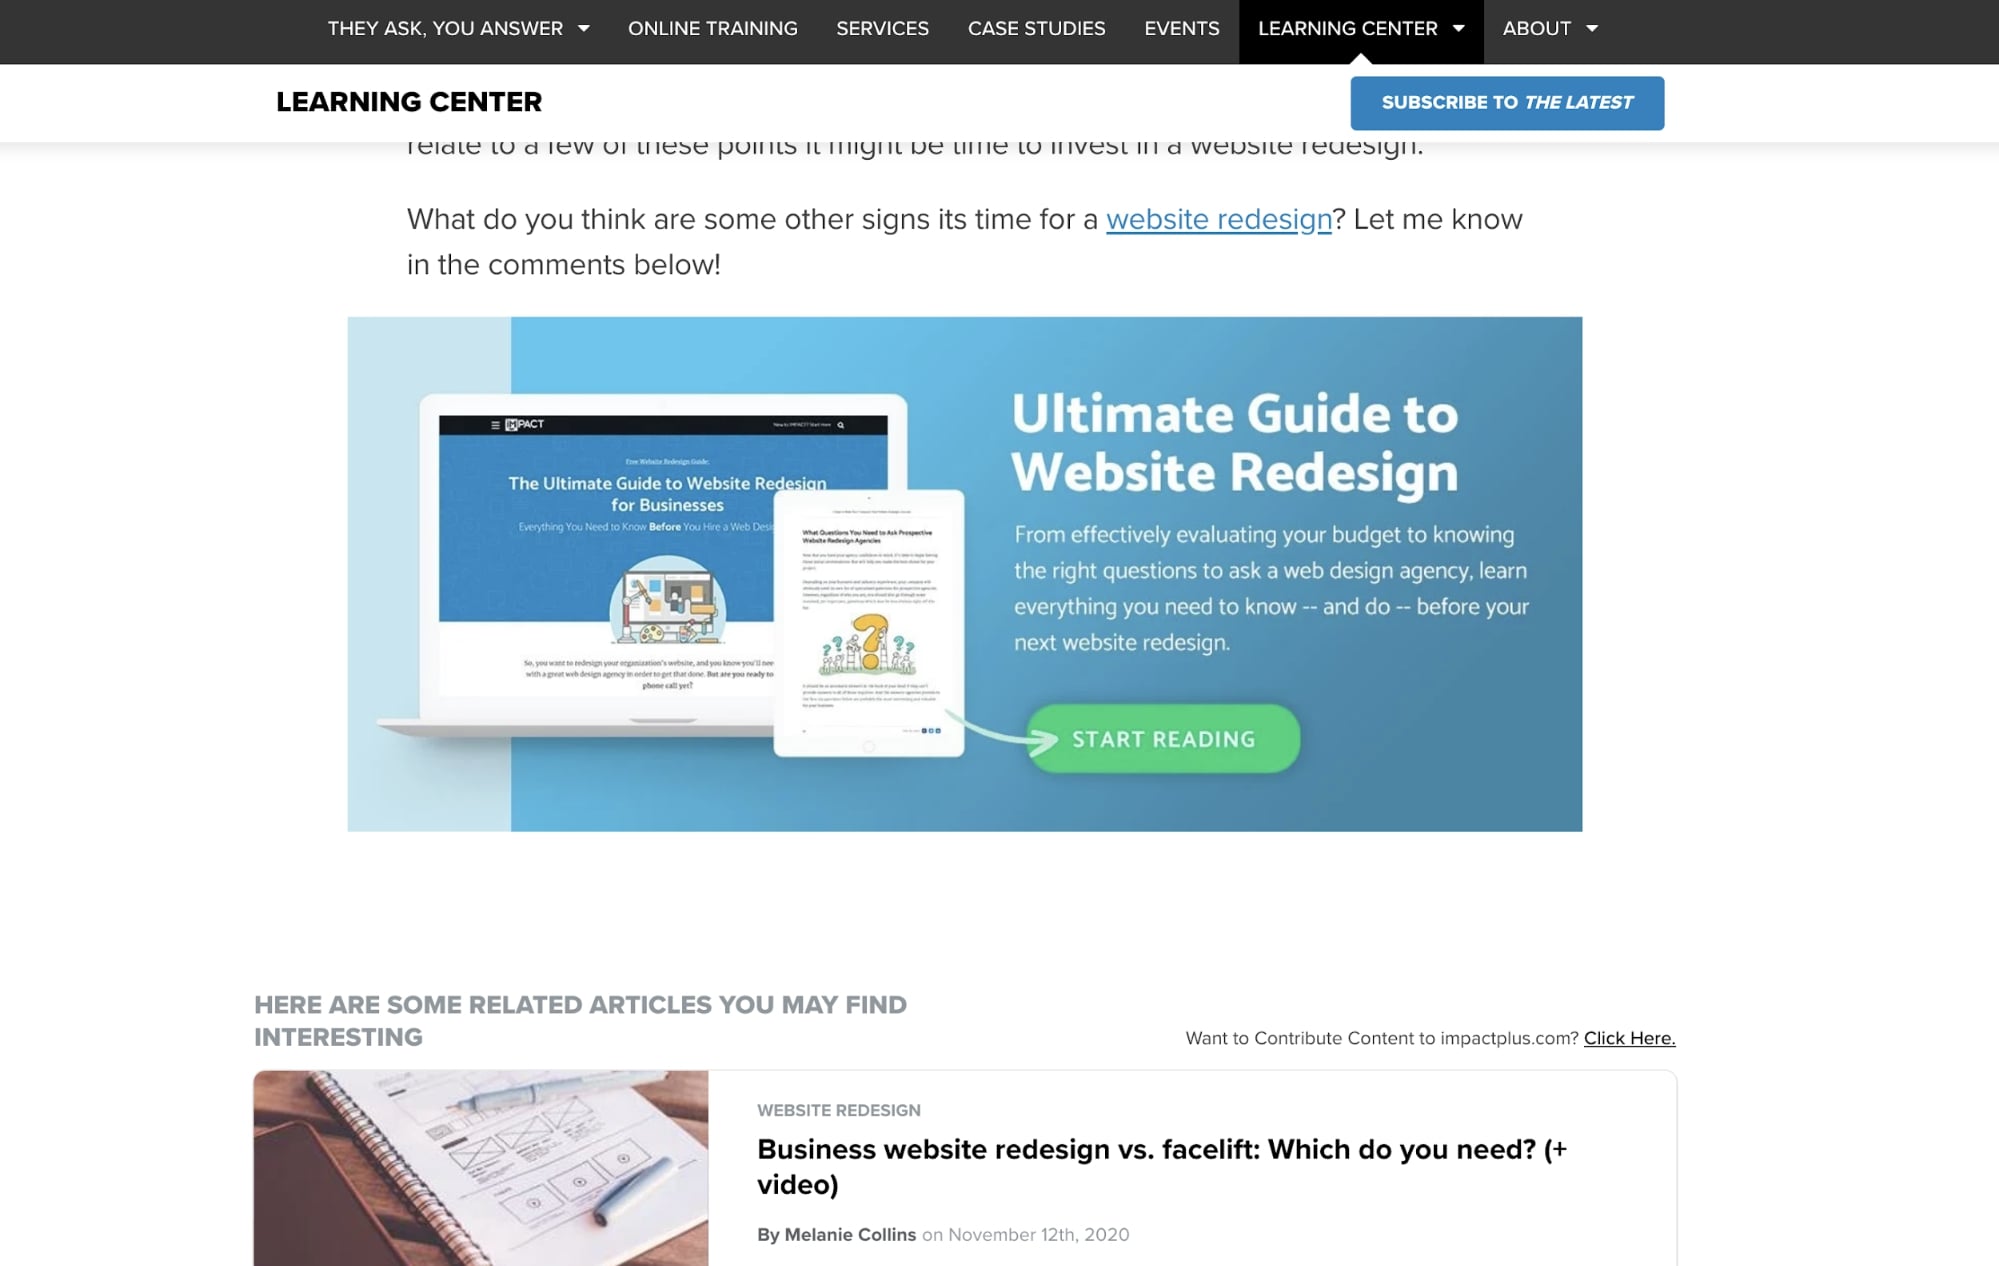
Offers like this also build trust. When your content genuinely educates people, they'll start to see your company as an expert and feel more comfortable researching your services.
5. Use the right stock images
We always recommend using original photography on your website, but if that's not an option, there are techniques you can use to pick the right kind of stock photo.
Stock photos save you the time of producing your own imagery, but many websites use images that fall into cliché. You'll also find that many other websites use the same images, which doesn't help your credibility.
Generic, staged imagery makes a company look interchangeable and can leave visitors wondering whether the people shown have anything to do with your business. That adds friction at exactly the moment you want them to trust you.
So, when choosing stock photos, stay away from cheesy images: people high-fiving with exaggerated smiles, groups posing for the camera, executives in superhero costumes, or groups of people in suits jumping in the air.
When was the last time you saw people in these scenarios in real life?
Look instead for photos that depict realistic scenes in well-lit environments. That could be people talking around a meeting table in business casual clothing, over-the-shoulder shots of someone typing on a laptop, or people drawing on a whiteboard in an open room. These are the kinds of scenes people recognize as legitimate. Look for candid images in real-life settings rather than studios.
So, rather than using photos like these:
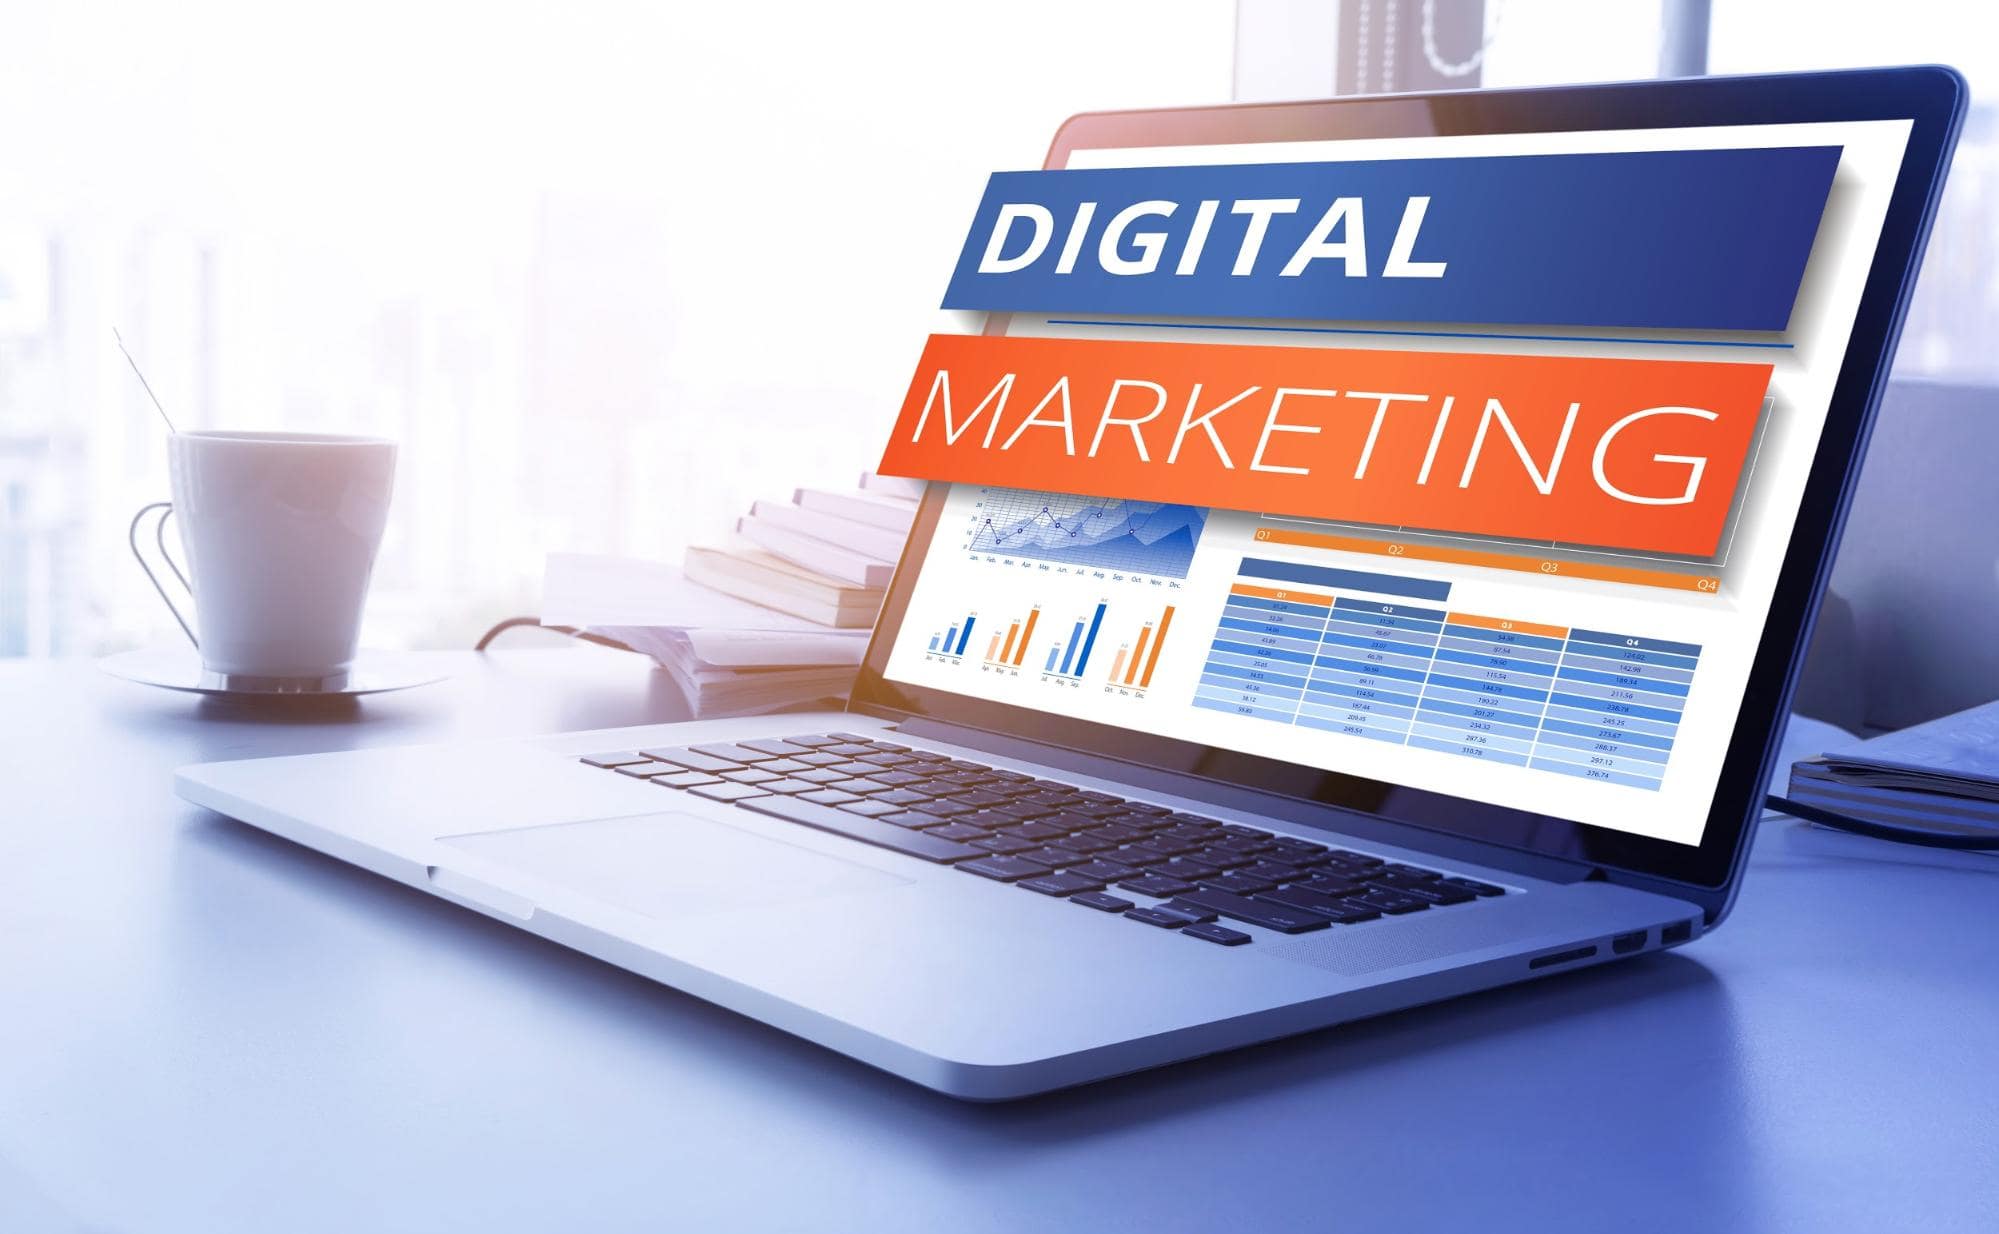


Which feel unrealistic for the reasons above, try photos like these:



Once you find photos you like, run them through a reverse image search tool such as TinEye or Google Lens to get an idea of how many other websites use them. If a photo appears on thousands of sites, it might be best to choose a less common one.
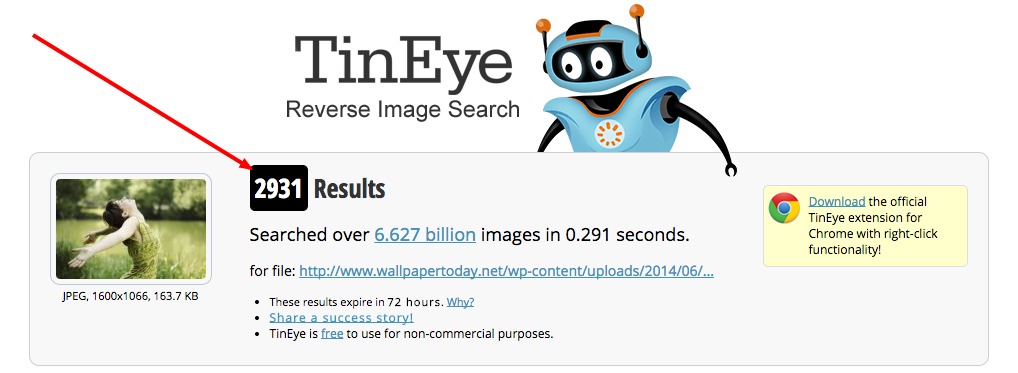
This brings more realism to your brand and makes sure your images match who you are and what your content explains.
Being more mindful with your photography will help you represent your brand the way you want others to perceive it.
6. Organize your navigation
Navigation is one of the most important parts of your website design. It's the map that shows the core places users can visit and how they can dive deeper into areas such as your services, products, and blog.
A disorganized or confusing navigation makes it hard for visitors to find where they want to go. Common culprits include overstuffed menus, vague or confusing link labels, and a lack of organization.
If users can't find what they're looking for, they have little reason to stay on your site and may leave for a competitor that offers a better experience.
When improving your website's navigation, focus on helping visitors find what they're looking for quickly. That means streamlined content, a clear navigation hierarchy, and responsive design, so the experience doesn't change drastically on mobile.
Zendesk's navigation, captured when this article was first written, is a good example. It included the pages you'd most likely want to visit: products, pricing (this is a must), services, and resources.
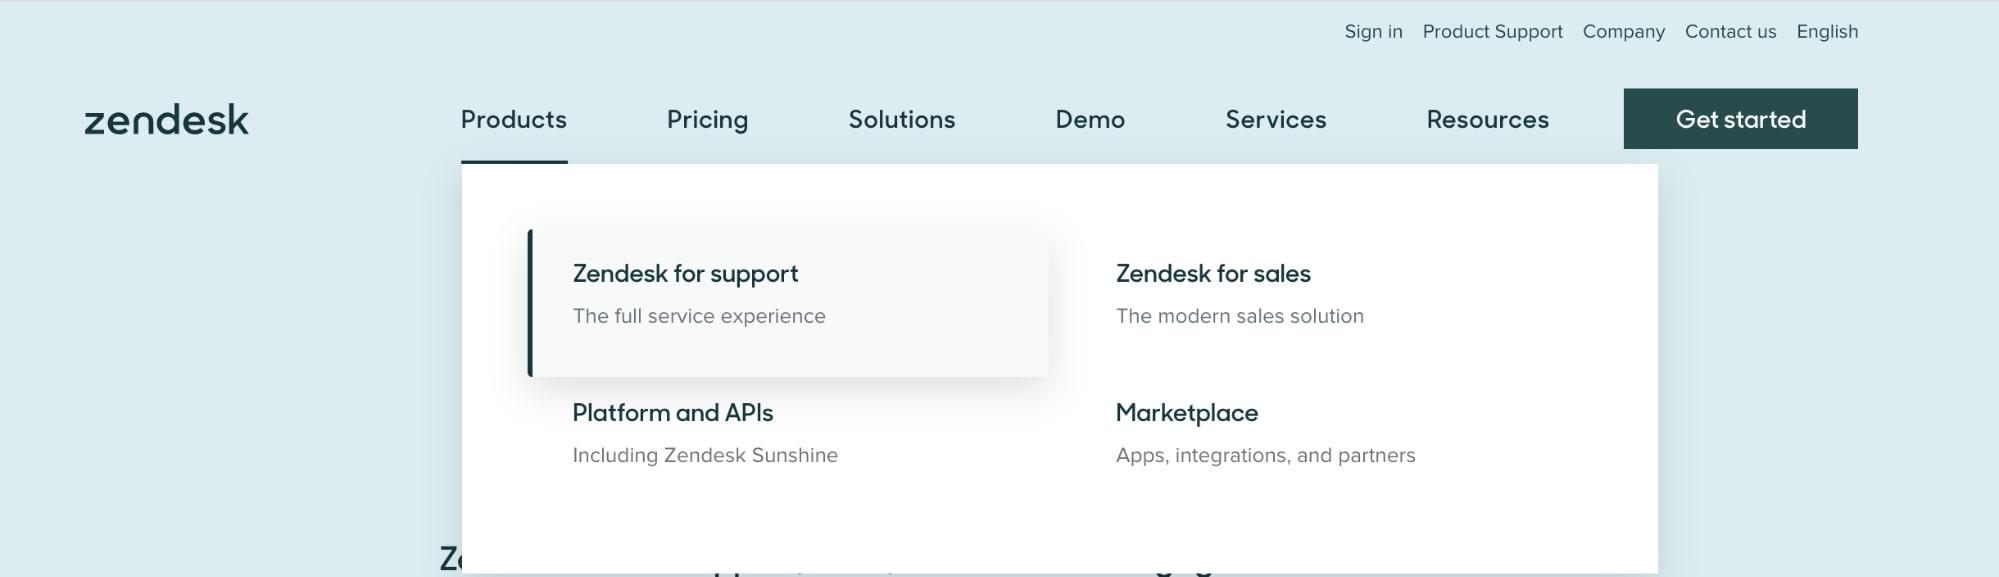
Each navigation item had ample space, so it was clear where one ended and the next began.
Some menu items, like the one in the image above, included a descriptive line that explained the purpose of the page. The hover effect also made it clear that these were links to other pages.
With one click, users could get to these places with ease. Make sure your navigation does the same without becoming overloaded.
Clean, well-organized navigation tells users you want them to move around your website easily and that you have nothing to hide. It also makes it more likely they'll explore more of your pages during a visit.
7. Let your visitors scroll on your homepage
There was a time when designers were wary of long pages, especially homepages, out of fear that users wouldn't scroll. That pushed people to cram as much as they could into the first screen.
People do scroll, but their attention still concentrates at the top of the page. In a 2018 eyetracking study by the Nielsen Norman Group, users spent about 57% of their page-viewing time above the fold and 74% in the first two screenfuls of content. In the group's earlier 2010 research, about 80% of viewing time was spent above the fold.
The takeaway is that you don't need to cram everything into the first screen, but you do need to put your most important message and next step at the top, then give people a reason to keep scrolling.
A good rule of thumb is to include three to five sections that direct new and returning visitors to the key areas of your site.
What should these sections be? The list could go on, but some of the most important elements include:
- Value proposition
- Intro video
- Overview of services
- Product features
- About your company
- Testimonials
- Case studies or success stories
- Content
When this article was first written, the Zenefits homepage hit many of these points.
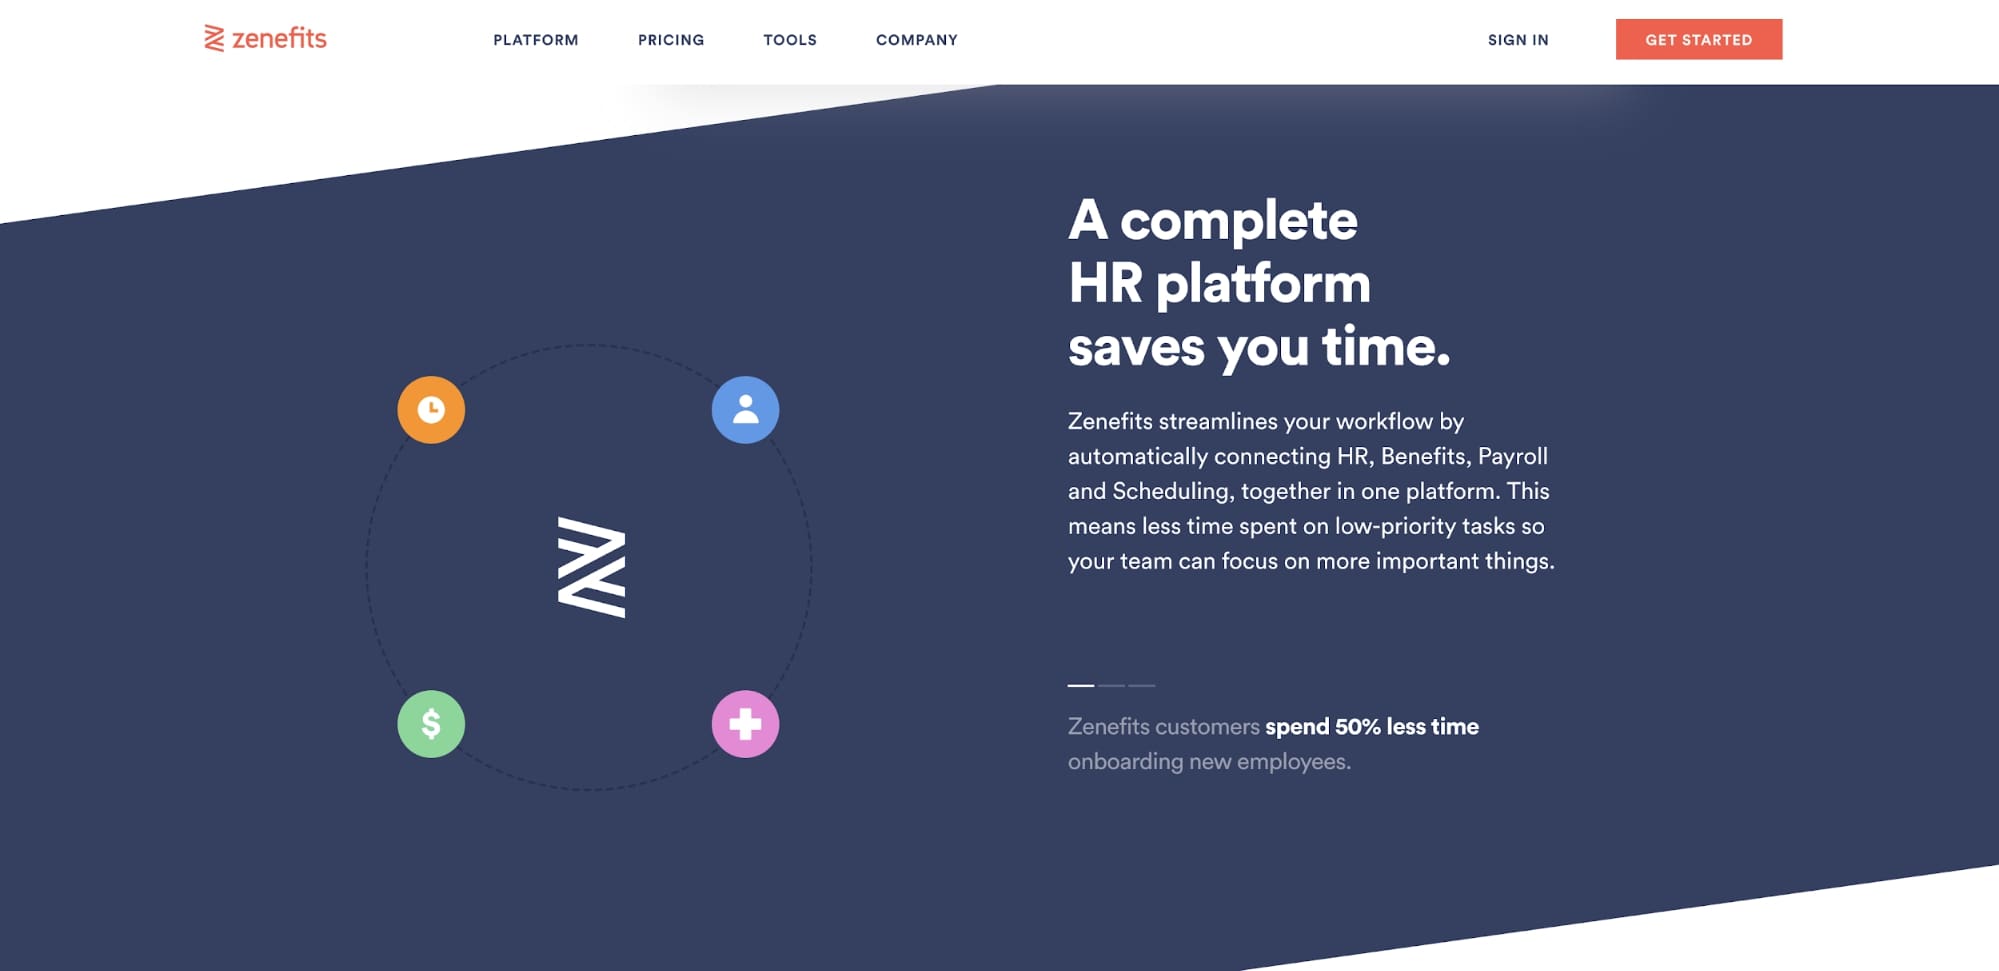
The page walked visitors through a brief overview of the tool, its features, and testimonials, and ended with a call-to-action for a demo.
By the end of the page, users had a well-rounded idea of what Zenefits could do for them and how clients felt about the platform.
8. Don't be afraid of white space
White space is an essential design element that breaks up the page and increases readability. Also called "negative space," it refers to the areas around elements on a page that are empty of content or visual items.
White space also plays an important role in positioning website elements. More white space signals which sections are separate and guides the eye, while less white space signals which elements are related because of their proximity.
Vidyard's website, captured when this article was first written, is a good example. Its sections were separated generously so each fit nicely within the viewport, without crowding from the sections above or below.
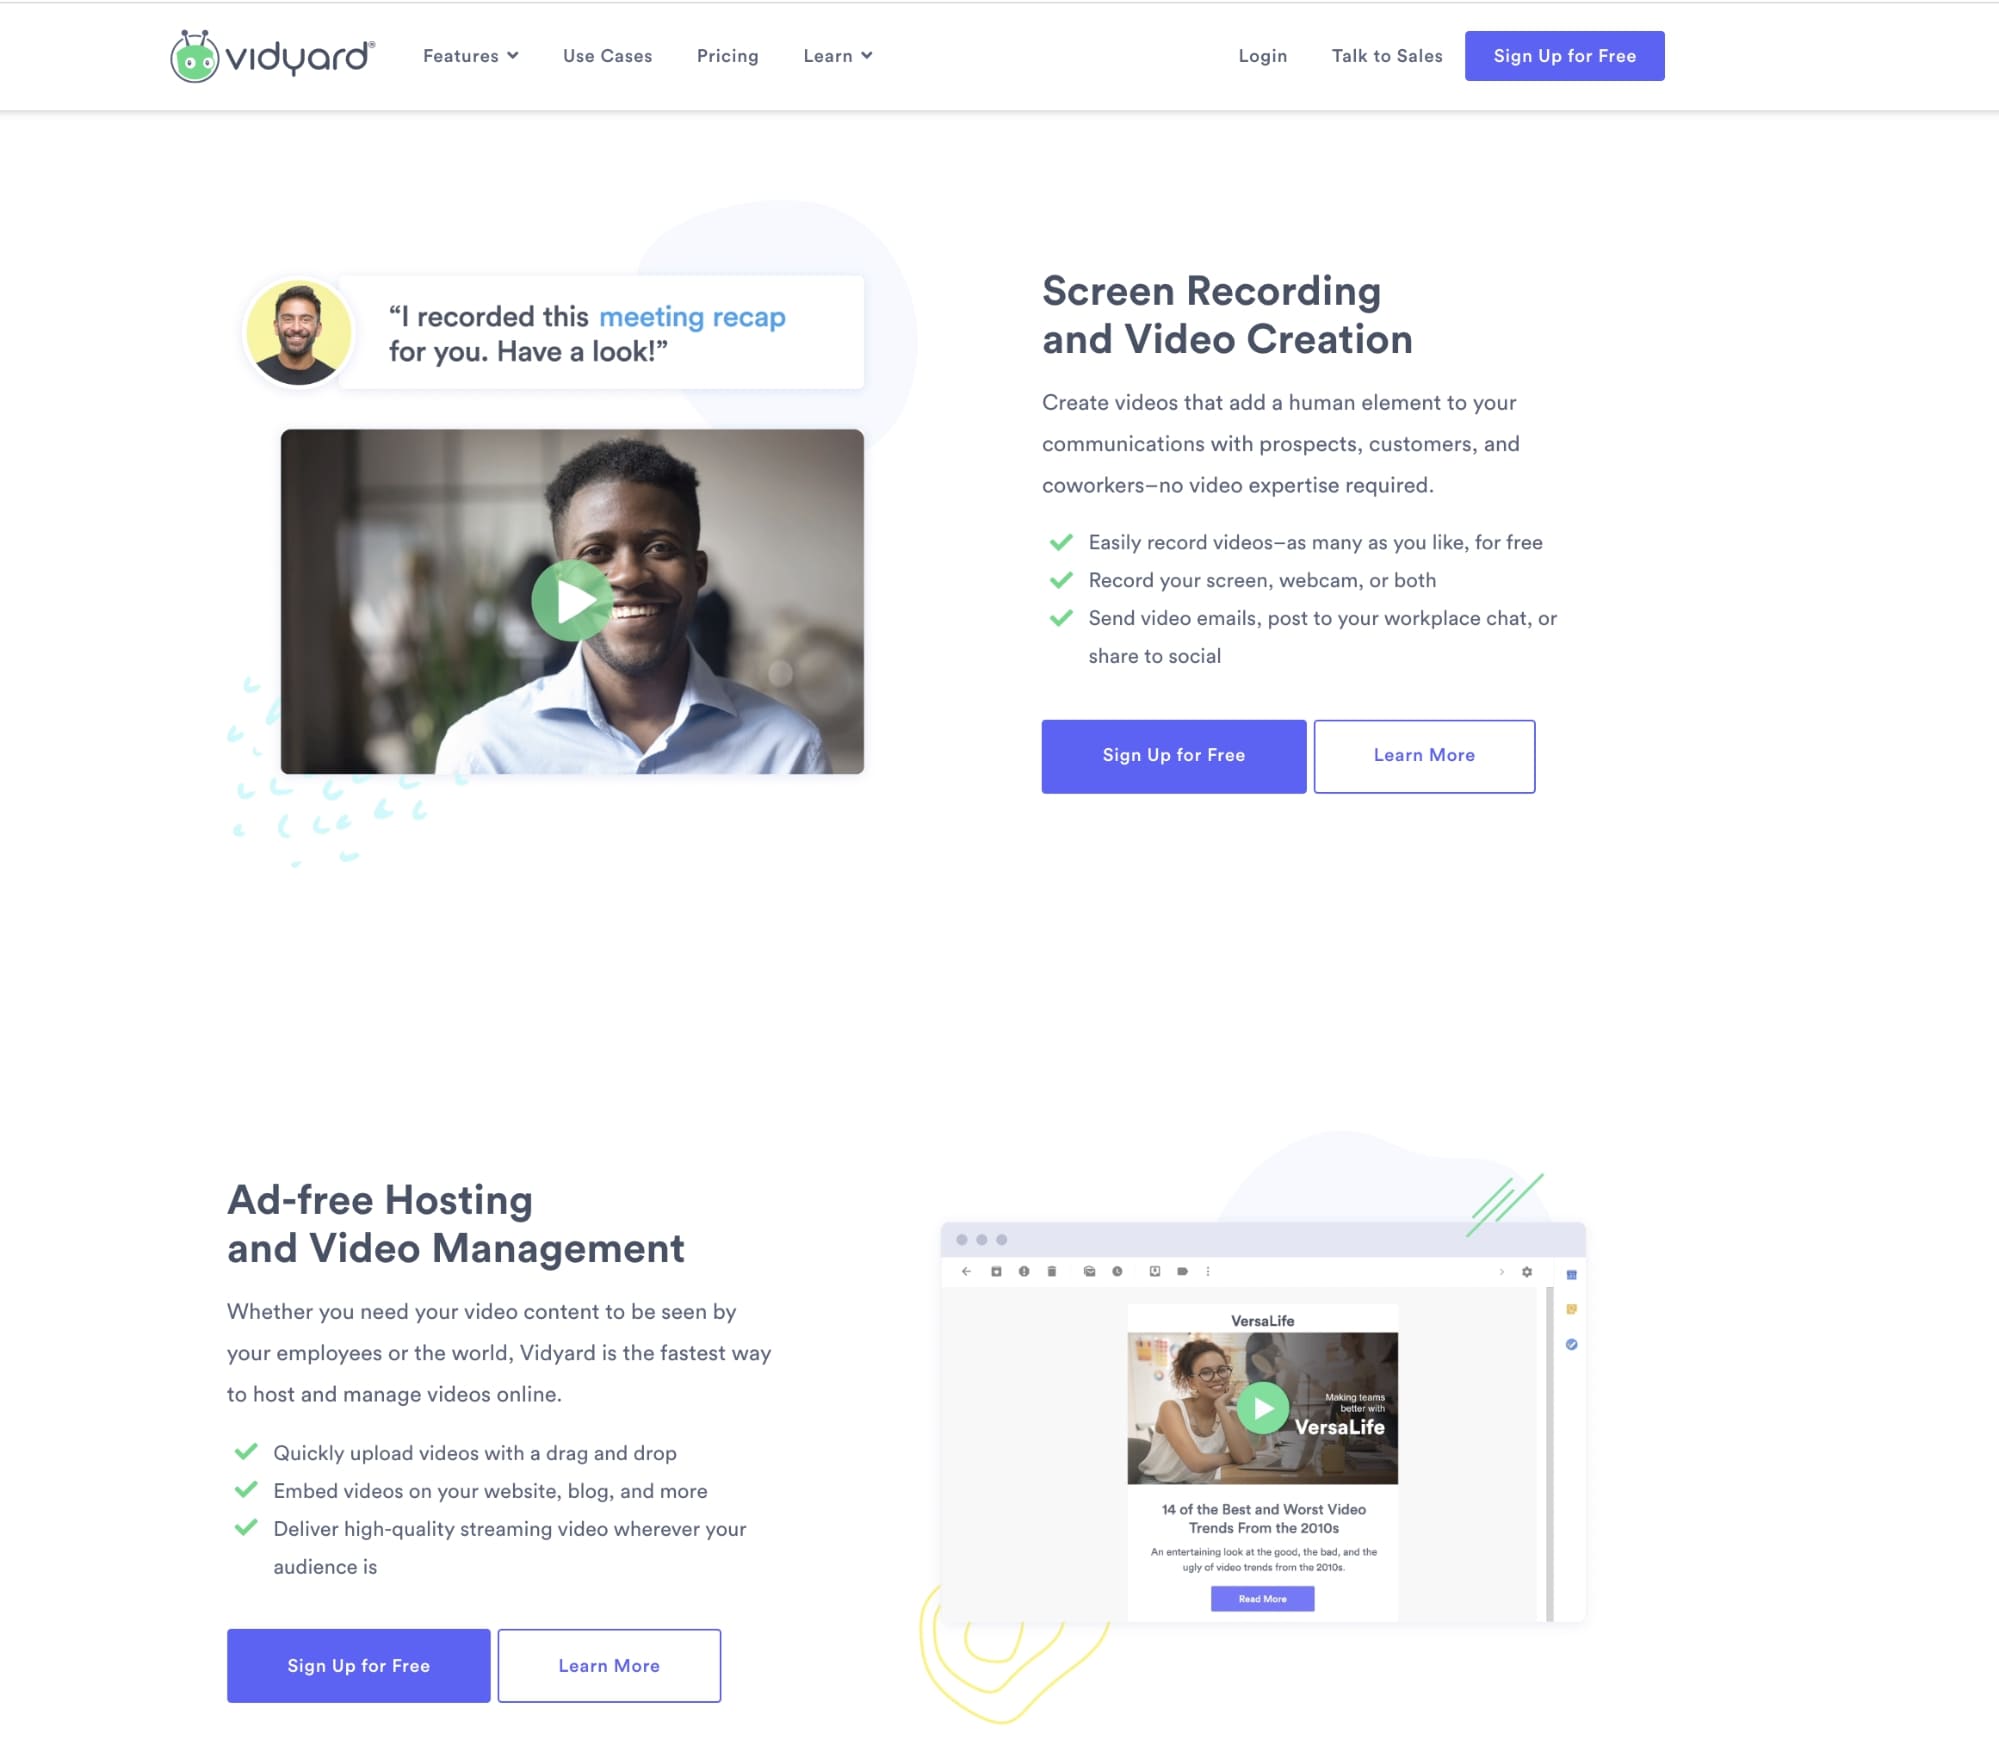
This lets users focus on each part of a page one piece at a time and instantly shows where each section begins and ends. It also helps guide the eye to important information such as a call-to-action or value proposition.
9. Make mobile optimization a must
Many of your visitors will see your website on a phone first, so optimizing for mobile is critical. Check your analytics to see what share of your traffic comes from mobile devices and which pages those visitors use most.
But mobile optimization is about more than a responsive layout. Tailor the experience to what your visitors need. Ask yourself: Why would someone visit my site on mobile? What would they look for? Does my site let them do those things easily?
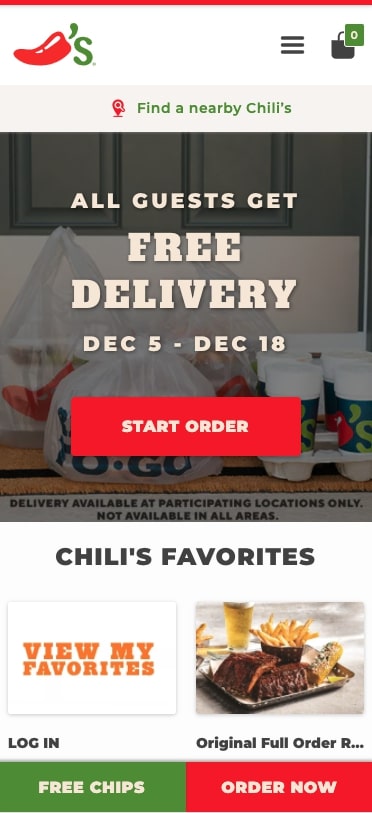
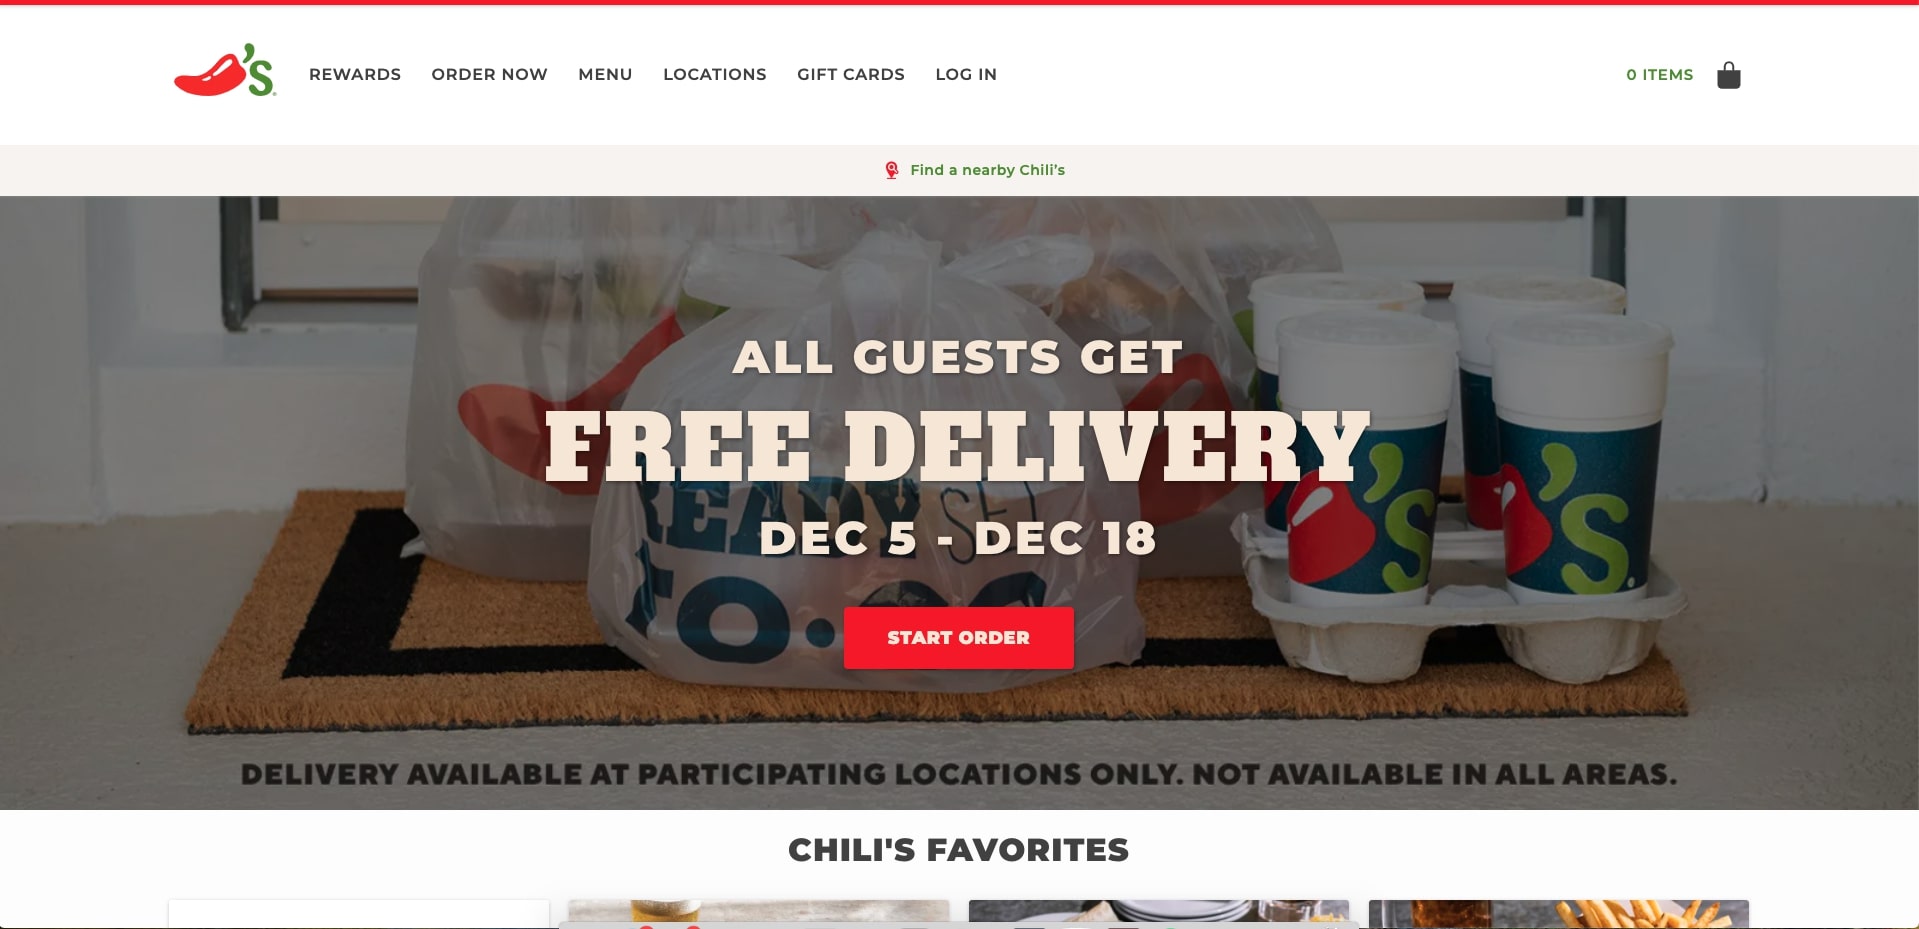
When this article was first written, Chili's desktop and mobile websites were very similar. Customers who switched between the two to place orders found a familiar experience either way.
The mobile site also made the core task, ordering food, easy. The ordering button stayed on screen, so you could order whenever you were ready without going to a different page.
10. Make pricing easy to find
Tell me if this situation sounds familiar.
You're looking for a new software product to solve a problem. For this story, let's say a project management tool.
You've spent the past hour vetting a few options and think you've finally found one that looks promising. Now you try to find pricing.
You click on the pricing page only to arrive at a page that looks something like this:
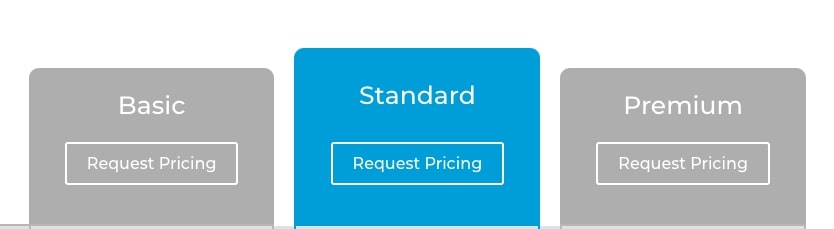
At this point, you're probably frustrated. You might wonder whether this means it's too expensive, or what they're trying to hide.
So you leave the site and look at competitors.
If your site follows a similar pattern, or worse, has no pricing page at all, your visitors are likely to react the same way.
I can't stress enough how important it is to include pricing on your website. It lets visitors complete their research the way modern buyers want to and qualify or disqualify themselves, which saves your sales team from spending time with people who aren't a good fit.
You may worry that competitors will undercut you, or that your pricing is too complicated to show. Even then, you can explain what drives your costs, show typical ranges, and help prospects understand the value they get.
And if someone is only looking for the cheapest possible price, they're likely not a good fit for you anyway.
When this article was first written, Trello's pricing page made it easy for users to figure out which tier fit them and what it would cost.
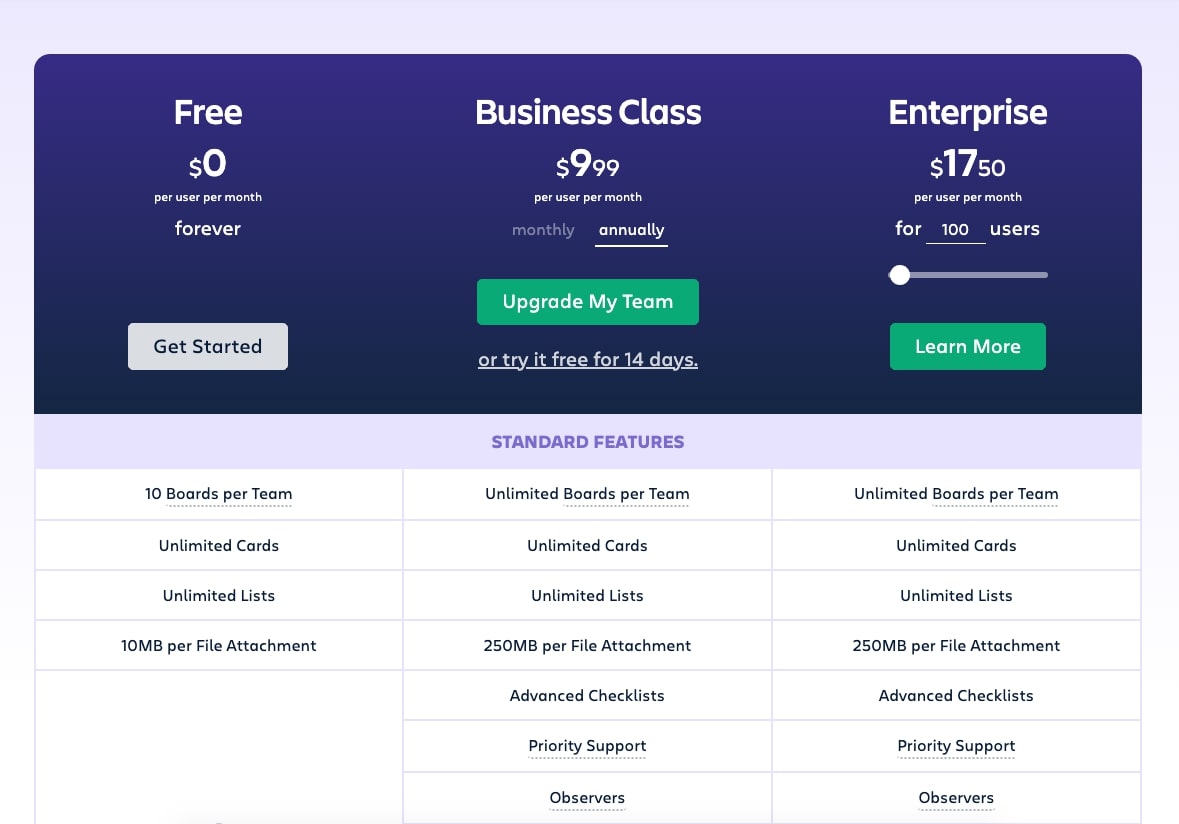
Each tier listed its included features underneath, so comparing them was as simple as reading left to right. The green buttons on the last two tiers also drew the eye to the options Trello most wanted to highlight.
11. Create a self-service experience
As someone who gets overwhelmed shopping on e-commerce websites, I'm always happy to find tools that help me choose the right thing.
These tools, often called self-service or self-selection tools, take users through a series of questions to arrive at a specific result. That result could be a customized quote, a product recommendation, or an answer to a specific question.
Tools like this make it much easier for people to understand which products or services are best for them without navigating your entire website to find the answer. If you're considering one, our guide to the business case for self-service tools explains the main types and what each one does for buyers.
A simple example, when this article was first written, was a recommendation feature below certain items on Amazon. Whenever you gave a thumbs up or down to a product shown, the feed changed to show products closer to what you were looking for.
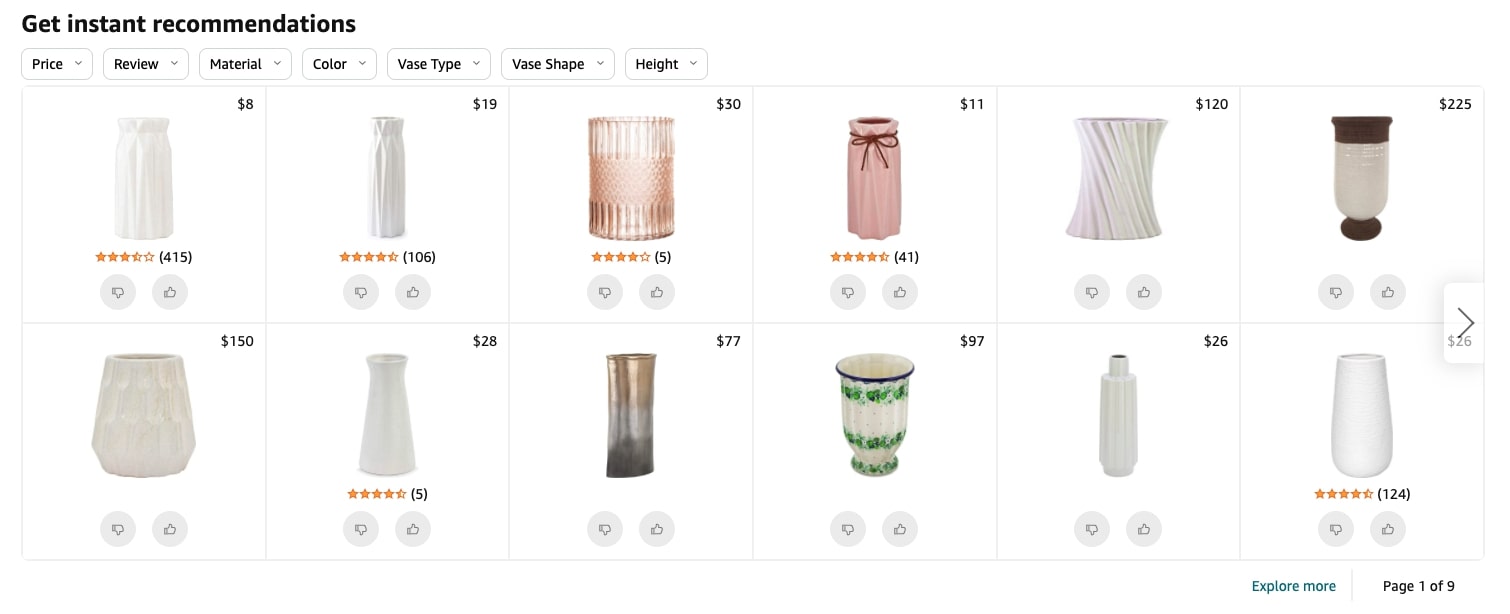
Needless to say, it made finding the perfect vase a lot easier for me!
Another example is Yale Appliance's pro range configurator, which matches the options you select to the products that fit them.
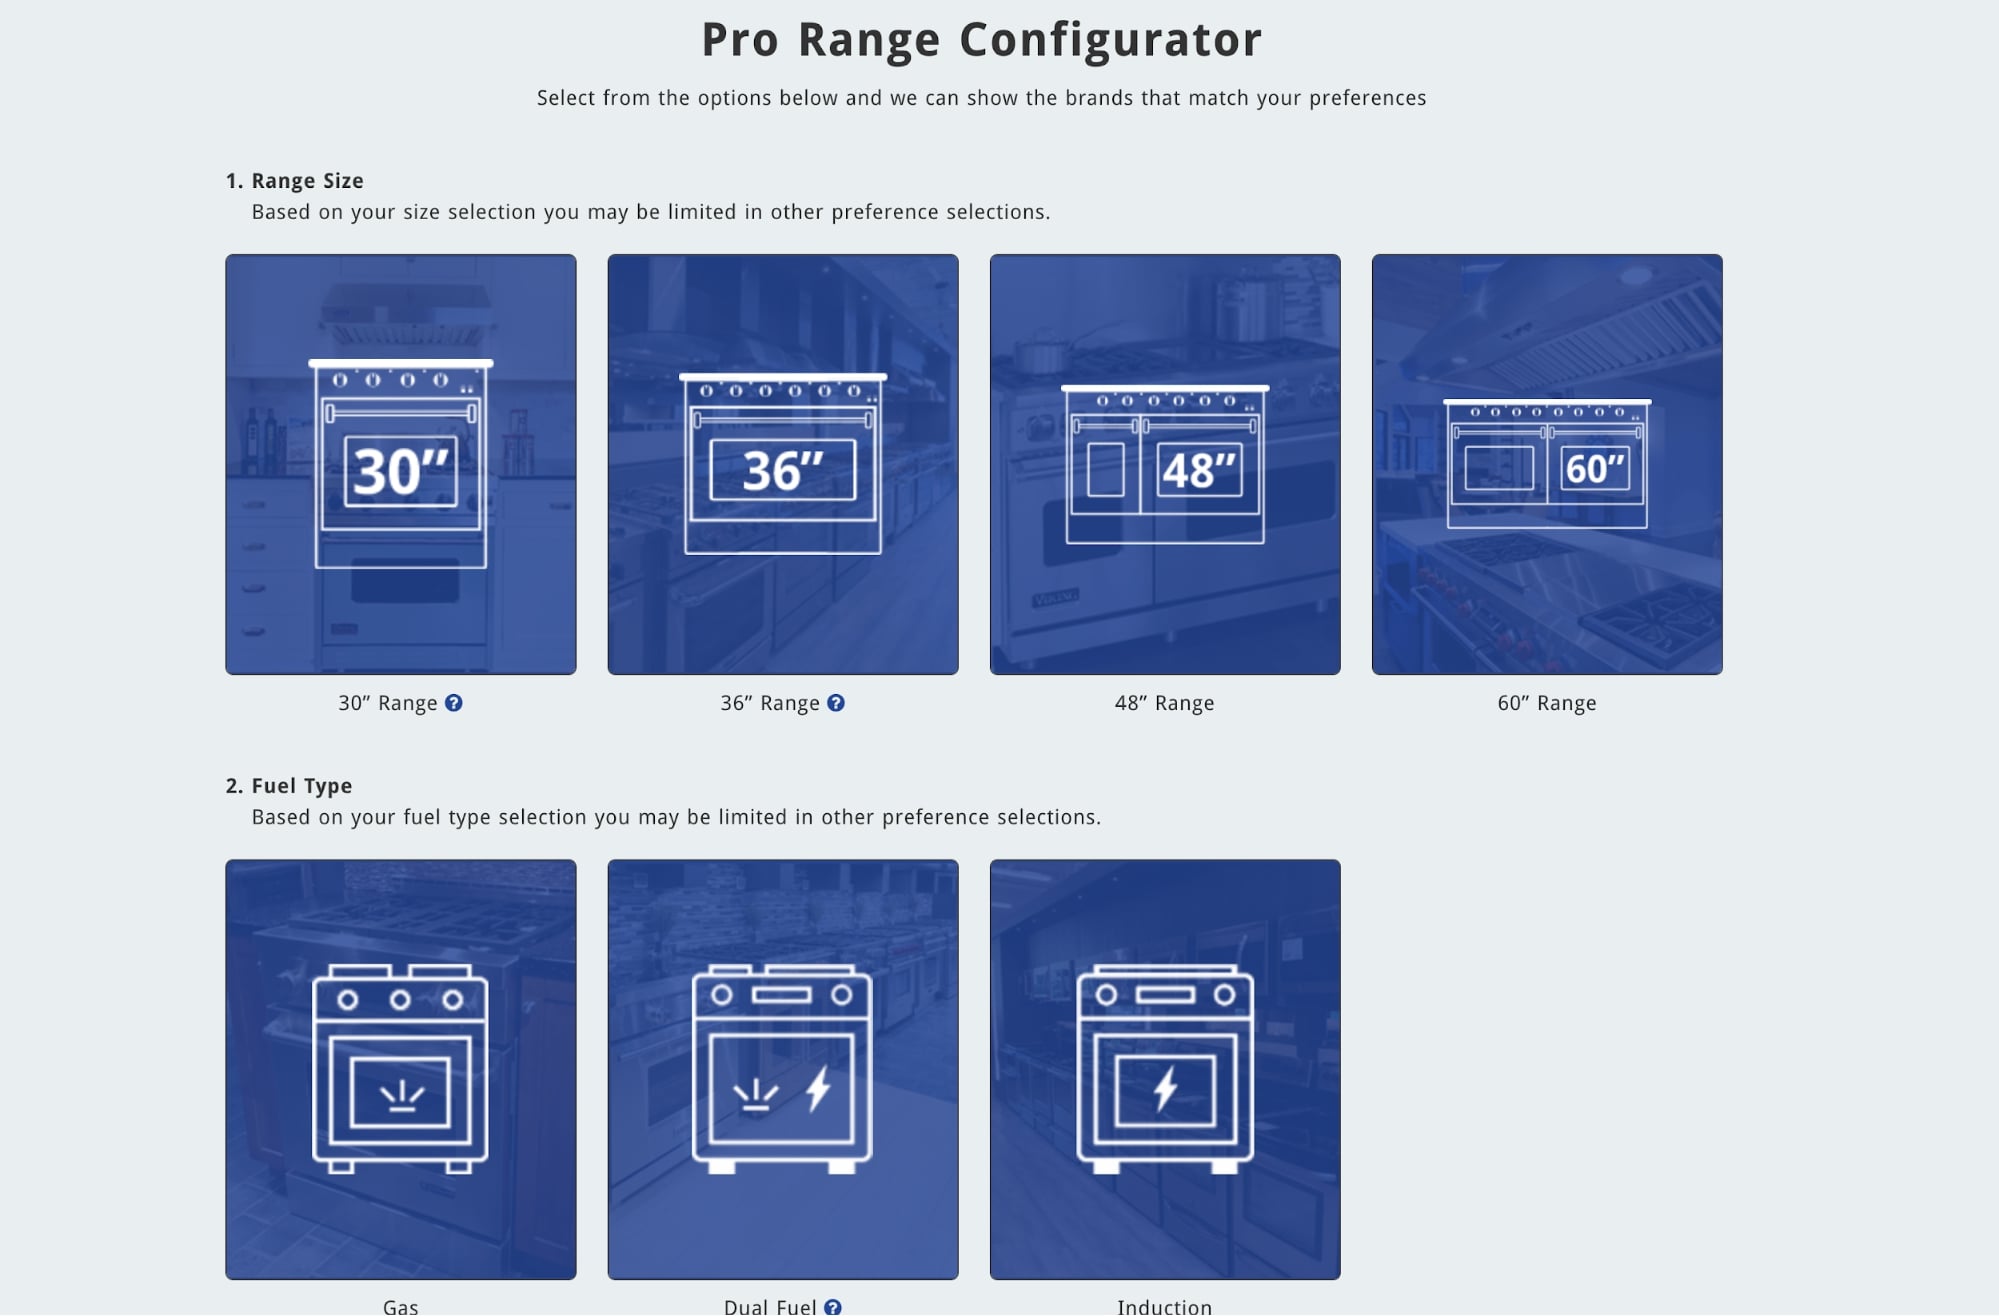
Using detailed iconography, users select the options that fit their situation and are shown the products that match. That saves them time searching the website and the trouble of calling a sales representative.
The faster you help prospects find what they're looking for, the sooner they may be ready to buy.
This may be a later project for your team, but it's a worthwhile one that can set your company apart from competitors and give buyers a better experience.
12. Test and iterate
Your website should be a living, evolving part of your company, not a static brochure. There's almost always room for improvement. Changes can improve conversions, time on page, and pages per session, but knowing which change will work best is the hard part.
That's where A/B testing comes in. Testing two variations of a page against each other can reveal whether certain areas are creating problems for your users.
In some cases, your pages may be performing well but contain outdated information. Testing an updated version can show how much the content affects engagement or conversions.
In other cases, you may want to see whether design updates affect a page's performance. Simple changes to button colors, headers, or copy can make a meaningful difference in conversion rate.
Rather than taking a set-it-and-forget-it approach, especially if you don't know what to change, use tools to run A/B or multivariate tests and set up heat maps or session recordings to see what users are doing.
Each of these can reveal why users interact with your pages the way they do.
From there, I'd review your tests and tools weekly or every other week to see how your changes are affecting page performance. Checking frequently lets you adjust sooner if things are heading in the wrong direction.
For heat maps and session recordings, look at tools such as Microsoft Clarity, Lucky Orange, or Contentsquare (which now includes Hotjar). For A/B testing, options include VWO and AB Tasty. Before buying a separate tool, check whether your CMS already includes testing features.
Key takeaways
Implementing these tips can noticeably improve the performance, experience, and conversion rates of your website. Once some of them are in place, you may start to wonder whether the bigger project is a full redesign.
That's a bigger undertaking, and you're not alone in considering it. Whether you're deciding if a redesign makes sense or just want to understand what's involved, start with your overall website strategy: who your site is for, what they need to find, and what you want them to do next.
That way, you'll be better prepared when a website redesign conversation comes up in your organization and more confident about what needs to be done.
Order Your Copy of Marcus Sheridan's New Book — Endless Customers!